

https://segmentfault.com/a/1190000012833867?utm_source=sf-related
https://www.5axxw.com/questions/content/e8hdl8
https://www.cnblogs.com/momo798/p/17292621.html
处理模型

参数说明
1 2 3 4 5 6 7 8 9 10 11 12 13 14 15 16 17 18 19 20 | |
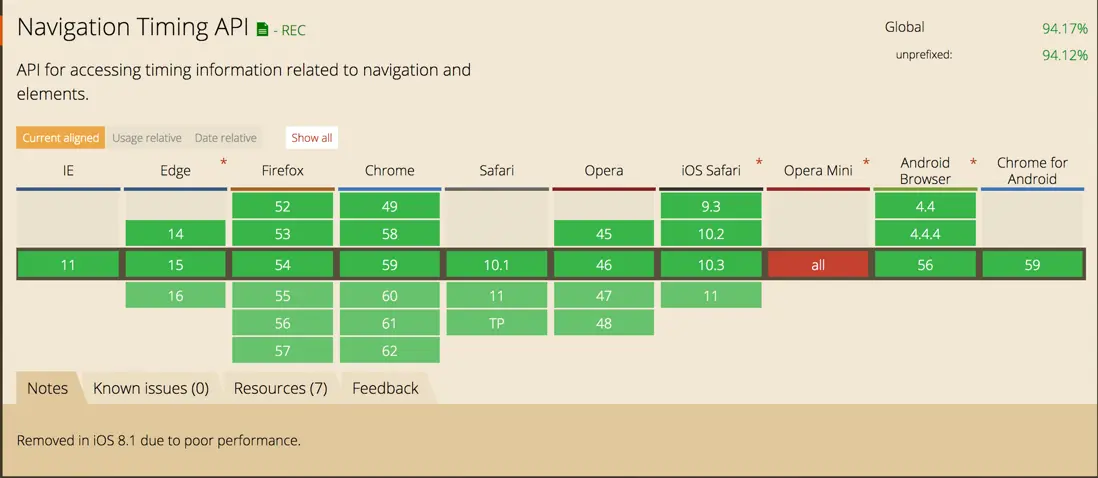
兼容性:
案例
DNS解析时间: domainLookupEnd - domainLookupStart
TCP建立连接时间: connectEnd - connectStart
白屏时间: responseStart - navigationStart
dom渲染完成时间: domContentLoadedEventEnd - navigationStart
页面onload时间: loadEventEnd - navigationStart
1 2 3 4 5 6 7 8 9 10 11 12 13 14 | |
字段说明
| key | 说明 |
|---|---|
| connectEnd | HTTP(TCP) 完成建立连接的时间(完成握手),如果是持久连接,则与 fetchStart 值相等,如果在传输层发生了错误且重新建立连接,则这里显示的是新建立的连接完成的时间 |
| connectStart | HTTP(TCP) 开始建立连接的时间,如果是持久连接,则与 fetchStart 值相等,如果在传输层发生了错误且重新建立连接,则这里显示的是新建立的连接开始的时间 |
| decodedBodySize | 从HTTP或缓存中获取的消息体积大小 |
| domainLookupEnd | DNS 域名查询完成的时间,如果使用了本地缓存(即无 DNS 查询)或持久连接,则与 fetchStart 值相等 |
| domainLookupStart | DNS 域名查询开始的时间,如果使用了本地缓存(即无 DNS 查询)或持久连接,则与 fetchStart 值相等 |
| duration | 加载时间 |
| encodedBodySize | 从HTTP或缓存中获取的body体积大小 |
| entryType | 资源类型,entryType类型不同数组中的对象结构也不同 |
| fetchStart | 浏览器准备好使用 HTTP 请求抓取文档的时间,这发生在检查本地缓存之前 |
| initiatorType | 谁发起的请求 |
| name | 资源名称,是资源的绝对路径或调用mark方法自定义的名称 |
| nextHopProtocol | 获取资源使用的网络协议 |
| redirectEnd | 最后一个 HTTP 重定向完成时的时间。有跳转且是同域名内的重定向才算,否则值为 0 |
| redirectStart | 第一个 HTTP 重定向发生时的时间。有跳转且是同域名内的重定向才算,否则值为 0 |
| requestStart | HTTP 请求读取真实文档开始的时间(完成建立连接),包括从本地读取缓存,连接错误重连时,这里显示的也是新建立连接的时间 |
| responseEnd | HTTP 响应全部接收完成的时间(获取到最后一个字节),包括从本地读取缓存 |
| responseStart | HTTP 开始接收响应的时间(获取到第一个字节),包括从本地读取缓存 |
| secureConnectionStart | HTTPS 连接开始的时间,如果不是安全连接,则值为 0 |
| serverTiming | 包含服务时间元数据的数组 |
| startTime | 开始时间 |
| transferSize | 加载资源的体积大小,包含请求头及请求体 |
| workerStart | DOMHighResTimeStamp |