diff --git a/.config b/.config
index cf146c1c..f5be3370 100644
--- a/.config
+++ b/.config
@@ -1054,6 +1054,11 @@ CONFIG_TCP_CONG_ILLINOIS=m
CONFIG_TCP_CONG_DCTCP=m
CONFIG_TCP_CONG_CDG=m
CONFIG_TCP_CONG_BBR=m
+CONFIG_TCP_CONG_LIA=m
+CONFIG_TCP_CONG_OLIA=m
+CONFIG_TCP_CONG_WVEGAS=m
+CONFIG_TCP_CONG_BALIA=m
+# CONFIG_TCP_CONG_MCTCPDESYNC is not set
CONFIG_DEFAULT_CUBIC=y
# CONFIG_DEFAULT_RENO is not set
CONFIG_DEFAULT_TCP_CONG="cubic"
@@ -1090,6 +1095,21 @@ CONFIG_IPV6_PIMSM_V2=y
CONFIG_IPV6_SEG6_LWTUNNEL=y
CONFIG_IPV6_SEG6_HMAC=y
CONFIG_NETLABEL=y
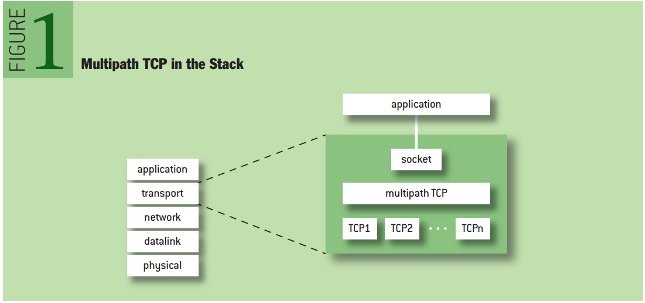
+CONFIG_MPTCP=y
+CONFIG_MPTCP_PM_ADVANCED=y
+CONFIG_MPTCP_FULLMESH=y
+CONFIG_MPTCP_NDIFFPORTS=m
+CONFIG_MPTCP_BINDER=m
+# CONFIG_MPTCP_NETLINK is not set
+CONFIG_DEFAULT_FULLMESH=y
+# CONFIG_DEFAULT_DUMMY is not set
+CONFIG_DEFAULT_MPTCP_PM="fullmesh"
+CONFIG_MPTCP_SCHED_ADVANCED=y
+# CONFIG_MPTCP_BLEST is not set
+CONFIG_MPTCP_ROUNDROBIN=m
+CONFIG_MPTCP_REDUNDANT=m
+CONFIG_DEFAULT_SCHEDULER=y
+CONFIG_DEFAULT_MPTCP_SCHED="default"
CONFIG_NETWORK_SECMARK=y
CONFIG_NET_PTP_CLASSIFY=y
CONFIG_NETWORK_PHY_TIMESTAMPING=y
ip rule add table 1 from 192.168.2.5
ip route add 192.168.2.0/24 dev enp0s9 scope link table 1
ip route add default via 192.168.2.4 dev enp0s9 table 1

ip rule add table 2 from 192.168.3.5
ip route add 192.168.3.0/24 dev enp0s10 scope link table 2
ip route add default via 192.168.3.4 dev enp0s10 table 2
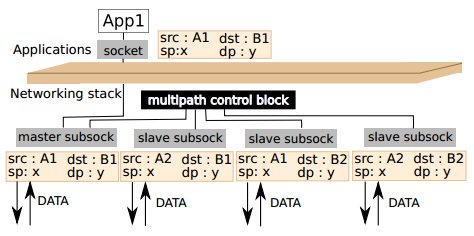
MPTCP路径管理,有四个不同的配置值,分别是 default/fullmesh/ndiffports/binder。default/ndiffports/fullmesh分别选择单路、多路或者全路进行传输。其中单路是指跟传统TCP状态一样还是用单一的TCP子流进行传输,多路是当前所有TCP子流中用户选择x条子流数进行传输,全路是指将当前所有可用的TCP子流应用到网络传输中。而binder参考了文献 Binder: a system to aggregate multiple internet gateways in community networks。