In file included from ./include/linux/list.h:9:0,
                 from ./include/linux/module.h:9,
                 from /root/Software/newbbr/tcp_tsunami.c:59:
./include/linux/kernel.h:6:10: fatal error: stdarg.h: No such file or directory
 #include <stdarg.h>
          ^~~~~~~~~~
compilation terminated.
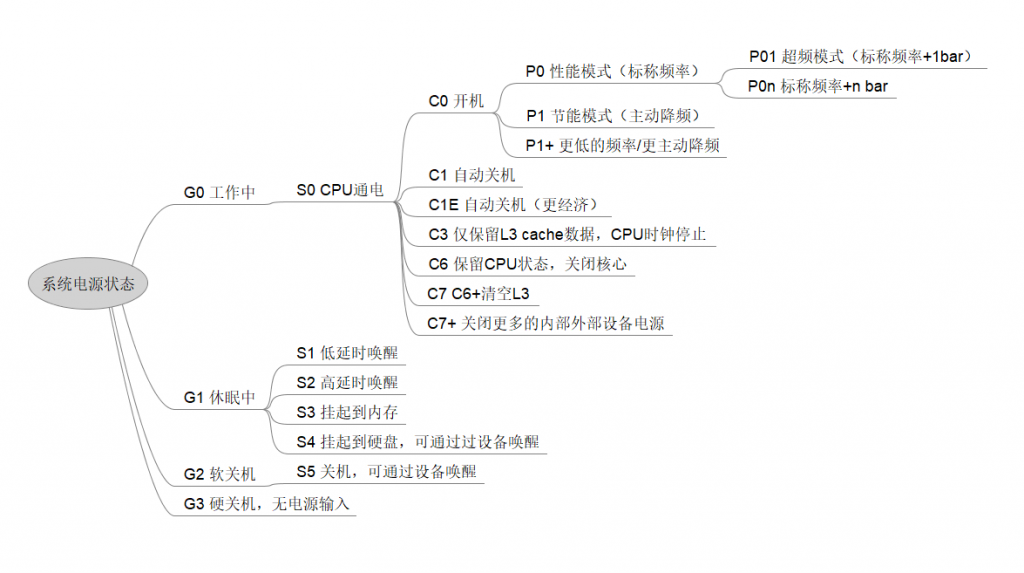
      max_perf_pct: Limits the maximum P-State that will be requested by
      the driver. It states it as a percentage of the available performance. The
      available (P-State) performance may be reduced by the no_turbo
      setting described below.

      min_perf_pct: Limits the minimum P-State that will be requested by
      the driver. It states it as a percentage of the max (non-turbo)
      performance level.

      no_turbo: Limits the driver to selecting P-State below the turbo
      frequency range.

      turbo_pct: Displays the percentage of the total performance that
      is supported by hardware that is in the turbo range. This number
      is independent of whether turbo has been disabled or not.

      num_pstates: Displays the number of P-States that are supported
      by hardware. This number is independent of whether turbo has
      been disabled or not.

For example, if a system has these parameters:
	Max 1 core turbo ratio: 0x21 (Max 1 core ratio is the maximum P-State)
	Max non turbo ratio: 0x17
	Minimum ratio : 0x08 (Here the ratio is called max efficiency ratio)

Sysfs will show :
	max_perf_pct:100, which corresponds to 1 core ratio
	min_perf_pct:24, max_efficiency_ratio / max 1 Core ratio
	no_turbo:0, turbo is not disabled
	num_pstates:26 = (max 1 Core ratio - Max Efficiency Ratio + 1)
	turbo_pct:39 = (max 1 core ratio - max non turbo ratio) / num_pstates

Refer to "Intel庐 64 and IA-32 Architectures Software Developer鈥檚 Manual
Volume 3: System Programming Guide" to understand ratios.

There is one more sysfs attribute in /sys/devices/system/cpu/intel_pstate/
that can be used for controlling the operation mode of the driver:

      status: Three settings are possible:
      "off"     - The driver is not in use at this time.
      "active"  - The driver works as a P-state governor (default).
      "passive" - The driver works as a regular cpufreq one and collaborates
                  with the generic cpufreq governors (it sets P-states as
                  requested by those governors).
      The current setting is returned by reads from this attribute.  Writing one
      of the above strings to it changes the operation mode as indicated by that
      string, if possible.  If HW-managed P-states (HWP) are enabled, it is not
      possible to change the driver's operation mode and attempts to write to
      this attribute will fail.
Warning: Please don’t use old title Ubuntu, with Linux 4.15.0-55-generic' for GRUB_DEFAULT, useAdvanced options for Ubuntu>Ubuntu, with Linux 4.15.0-55-generic' (for versions before 2.00) or `gnulinux-advanced-999d2fc9-3d7b-4654-a25c-4f5d4472a23b>gnulinux-4.15.0-55-generic-advanced-999d2fc9-3d7b-4654-a25c-4f5d4472a23b' (for 2.00 or later)