kk Blog —— 通用基础


date [-d @int|str] [+%s|"+%F %T"]
netstat -ltunp
sar -n DEV 1

Linux时间子系统之二:表示时间的单位和结构

http://blog.csdn.net/droidphone/article/details/7979295

1. jiffies

内核用jiffies变量记录系统启动以来经过的时钟滴答数,它的声明如下:

1
2
extern u64 __jiffy_data jiffies_64;
extern unsigned long volatile __jiffy_data jiffies;

可见,在32位的系统上,jiffies是一个32位的无符号数,系统每过1/HZ秒,jiffies的值就会加1,最终该变量可能会溢出,所以内核同时又定义了一个64位的变量jiffies_64,链接的脚本保证jiffies变量和jiffies_64变量的内存地址是相同的,通常,我们可以直接访问jiffies变量,但是要获得jiffies_64变量,必须通过辅助函数get_jiffies_64来实现。jiffies是内核的低精度定时器的计时单位,所以内核配置的HZ数决定了低精度定时器的精度,如果HZ数被设定为1000,那么,低精度定时器(timer_list)的精度就是1ms=1/1000秒。因为jiffies变量可能存在溢出的问题,所以在用基于jiffies进行比较时,应该使用以下辅助宏来实现:

1
2
3
4
5
time_after(a,b)
time_before(a,b)
time_after_eq(a,b)
time_before_eq(a,b)
time_in_range(a,b,c)

同时,内核还提供了一些辅助函数用于jiffies和毫秒以及纳秒之间的转换:

1
2
3
4
unsigned int jiffies_to_msecs(const unsigned long j);
unsigned int jiffies_to_usecs(const unsigned long j);
unsigned long msecs_to_jiffies(const unsigned int m);
unsigned long usecs_to_jiffies(const unsigned int u);

2. struct timeval

timeval由秒和微秒组成,它的定义如下:

1
2
3
4
struct timeval {
	__kernel_time_t    tv_sec;         /* seconds */
	__kernel_suseconds_t  tv_usec; /* microseconds */
};

__kernel_time_t__kernel_suseconds_t 实际上都是long型的整数。gettimeofday和settimeofday使用timeval作为时间单位。

3. struct timespec

timespec由秒和纳秒组成,它的定义如下:

1
2
3
4
struct timespec {
	__kernel_time_t tv_sec;          /* seconds */
	long      tv_nsec;         /* nanoseconds */
};

同样地,内核也提供了一些辅助函数用于jiffies、timeval、timespec之间的转换:

1
2
3
4
5
6
7
8
9
10
11
12
13
14
15
static inline int timespec_equal(const struct timespec *a, const struct timespec *b);
static inline int timespec_compare(const struct timespec *lhs, const struct timespec *rhs);
static inline int timeval_compare(const struct timeval *lhs, const struct timeval *rhs);
extern unsigned long mktime(const unsigned int year, const unsigned int mon,
				const unsigned int day, const unsigned int hour,
				const unsigned int min, const unsigned int sec);
extern void set_normalized_timespec(struct timespec *ts, time_t sec, s64 nsec);
static inline struct timespec timespec_add(struct timespec lhs, struct timespec rhs);
static inline struct timespec timespec_sub(struct timespec lhs, struct timespec rhs);

static inline s64 timespec_to_ns(const struct timespec *ts);
static inline s64 timeval_to_ns(const struct timeval *tv);
extern struct timespec ns_to_timespec(const s64 nsec);
extern struct timeval ns_to_timeval(const s64 nsec);
static __always_inline void timespec_add_ns(struct timespec *a, u64 ns);
1
2
3
4
unsigned long timespec_to_jiffies(const struct timespec *value);
void jiffies_to_timespec(const unsigned long jiffies, struct timespec *value);
unsigned long timeval_to_jiffies(const struct timeval *value);
void jiffies_to_timeval(const unsigned long jiffies, struct timeval *value);

timekeeper中的xtime字段用timespec作为时间单位。

4. struct ktime

linux的通用时间架构用ktime来表示时间,为了兼容32位和64位以及big-little endian系统,ktime结构被定义如下:

1
2
3
4
5
6
7
8
9
10
11
12
union ktime {
	s64 tv64;
#if BITS_PER_LONG != 64 && !defined(CONFIG_KTIME_SCALAR)
	struct {
# ifdef __BIG_ENDIAN
	s32 sec, nsec;
# else
	s32 nsec, sec;
# endif
	} tv;
#endif
};

64位的系统可以直接访问tv64字段,单位是纳秒,32位的系统则被拆分为两个字段:sec和nsec,并且照顾了大小端的不同。高精度定时器通常用ktime作为计时单位。下面是一些辅助函数用于计算和转换:

1
2
3
4
5
6
7
8
9
10
11
12
13
14
ktime_t ktime_set(const long secs, const unsigned long nsecs); 
ktime_t ktime_sub(const ktime_t lhs, const ktime_t rhs); 
ktime_t ktime_add(const ktime_t add1, const ktime_t add2); 
ktime_t ktime_add_ns(const ktime_t kt, u64 nsec); 
ktime_t ktime_sub_ns(const ktime_t kt, u64 nsec); 
ktime_t timespec_to_ktime(const struct timespec ts); 
ktime_t timeval_to_ktime(const struct timeval tv); 
struct timespec ktime_to_timespec(const ktime_t kt); 
struct timeval ktime_to_timeval(const ktime_t kt); 
s64 ktime_to_ns(const ktime_t kt); 
int ktime_equal(const ktime_t cmp1, const ktime_t cmp2); 
s64 ktime_to_us(const ktime_t kt); 
s64 ktime_to_ms(const ktime_t kt);
ktime_t ns_to_ktime(u64 ns);

Linux时间子系统之一:clock source(时钟源)

http://blog.csdn.net/droidphone/article/details/7975694

clock source用于为Linux内核提供一个时间基线,如果你用linux的date命令获取当前时间,内核会读取当前的clock source,转换并返回合适的时间单位给用户空间。在硬件层,它通常实现为一个由固定时钟频率驱动的计数器,计数器只能单调地增加,直到溢出为止。时钟源是内核计时的基础,系统启动时,内核通过硬件RTC获得当前时间,在这以后,在大多数情况下,内核通过选定的时钟源更新实时时间信息(墙上时间),而不再读取RTC的时间。本节的内核代码树基于V3.4.10。

1. struct clocksource结构

内核用一个clocksource结构对真实的时钟源进行软件抽象,现在我们从clock source的数据结构开始,它的定义如下:

1
2
3
4
5
6
7
8
9
10
11
12
13
14
15
16
17
18
19
20
21
22
23
24
25
26
27
28
29
30
31
32
33
struct clocksource {  
	/* 
	 * Hotpath data, fits in a single cache line when the 
	 * clocksource itself is cacheline aligned. 
	 */  
	cycle_t (*read)(struct clocksource *cs);  
	cycle_t cycle_last;  
	cycle_t mask;  
	u32 mult;  
	u32 shift;  
	u64 max_idle_ns;  
	u32 maxadj;  
#ifdef CONFIG_ARCH_CLOCKSOURCE_DATA  
	struct arch_clocksource_data archdata;  
#endif  
  
	const char *name;  
	struct list_head list;  
	int rating;  
	int (*enable)(struct clocksource *cs);  
	void (*disable)(struct clocksource *cs);  
	unsigned long flags;  
	void (*suspend)(struct clocksource *cs);  
	void (*resume)(struct clocksource *cs);  
  
	/* private: */  
#ifdef CONFIG_CLOCKSOURCE_WATCHDOG  
	/* Watchdog related data, used by the framework */  
	struct list_head wd_list;  
	cycle_t cs_last;  
	cycle_t wd_last;  
#endif  
} ____cacheline_aligned;  

ocksource中的几个重要的字段。

1.1 rating:时钟源的精度

同一个设备下,可以有多个时钟源,每个时钟源的精度由驱动它的时钟频率决定,比如一个由10MHz时钟驱动的时钟源,他的精度就是100nS。clocksource结构中有一个rating字段,代表着该时钟源的精度范围,它的取值范围如下:

1
2
3
4
5
1--99: 不适合于用作实际的时钟源,只用于启动过程或用于测试;
100--199:基本可用,可用作真实的时钟源,但不推荐;
200--299:精度较好,可用作真实的时钟源;
300--399:很好,精确的时钟源;
400--499:理想的时钟源,如有可能就必须选择它作为时钟源;
1.2 read回调函数

时钟源本身不会产生中断,要获得时钟源的当前计数,只能通过主动调用它的read回调函数来获得当前的计数值,注意这里只能获得计数值,也就是所谓的cycle,要获得相应的时间,必须要借助clocksource的mult和shift字段进行转换计算。

1.3 mult和shift字段

因为从clocksource中读到的值是一个cycle计数值,要转换为时间,我们必须要知道驱动clocksource的时钟频率F,一个简单的计算就可以完成:

1
t = cycle/F;

可是clocksource并没有保存时钟的频率F,因为使用上面的公式进行计算,需要使用浮点运算,这在内核中是不允许的,因此,内核使用了另外一个变通的办法,根据时钟的频率和期望的精度,事先计算出两个辅助常数mult和shift,然后使用以下公式进行cycle和t的转换:

1
t = (cycle * mult) >> shift;

只要我们保证:

1
F = (1 << shift) / mult;

内核内部使用64位进行该转换计算:

1
2
3
4
static inline s64 clocksource_cyc2ns(cycle_t cycles, u32 mult, u32 shift)  
{  
	return ((u64) cycles * mult) >> shift;  
}  

从转换精度考虑,mult的值是越大越好,但是为了计算过程不发生溢出,mult的值又不能取得过大。为此内核假设cycle计数值被转换后的最大时间值:10分钟(600秒),主要的考虑是CPU进入IDLE状态后,时间信息不会被更新,只要在10分钟内退出IDLE,clocksource的cycle计数值就可以被正确地转换为相应的时间,然后系统的时间信息可以被正确地更新。当然最后的结果不一定是10分钟,它由clocksource_max_deferment进行计算,并保存max_idle_ns字段中,tickless的代码要考虑这个值,以防止在NO_HZ配置环境下,系统保持IDLE状态的时间过长。在这样,由10分钟这个假设的时间值,我们可以推算出合适的mult和shift值。

2. clocksource的注册和初始化

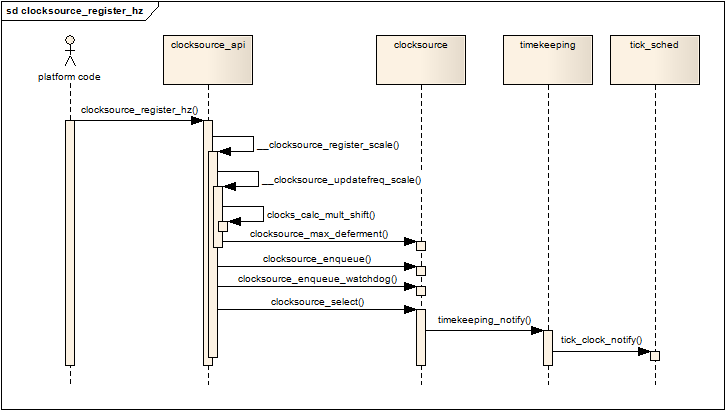
通常,clocksource要在初始化阶段通过clocksource_register_hz函数通知内核它的工作时钟的频率,调用的过程如下:

由上图可见,最终大部分工作会转由__clocksource_register_scale完成,该函数首先完成对mult和shift值的计算,然后根据mult和shift值,最终通过clocksource_max_deferment获得该clocksource可接受的最大IDLE时间,并记录在clocksource的max_idle_ns字段中。clocksource_enqueue函数负责按clocksource的rating的大小,把该clocksource按顺序挂在全局链表clocksource_list上,rating值越大,在链表上的位置越靠前。

每次新的clocksource注册进来,都会触发clocksource_select函数被调用,它按照rating值选择最好的clocksource,并记录在全局变量curr_clocksource中,然后通过timekeeping_notify函数通知timekeeping,当前clocksource已经变更,关于timekeeping,我将会在后续的博文中阐述。

3. clocksource watchdog

系统中可能同时会注册对个clocksource,各个clocksource的精度和稳定性各不相同,为了筛选这些注册的clocksource,内核启用了一个定时器用于监控这些clocksource的性能,定时器的周期设为0.5秒:

1
2
#define WATCHDOG_INTERVAL (HZ >> 1)  
#define WATCHDOG_THRESHOLD (NSEC_PER_SEC >> 4)  

当有新的clocksource被注册时,除了会挂在全局链表clocksource_list外,还会同时挂在一个watchdog链表上:watchdog_list。定时器周期性地(0.5秒)检查watchdog_list上的clocksource,WATCHDOG_THRESHOLD的值定义为0.0625秒,如果在0.5秒内,clocksource的偏差大于这个值就表示这个clocksource是不稳定的,定时器的回调函数通过clocksource_watchdog_kthread线程标记该clocksource,并把它的rate修改为0,表示精度极差。

4. 建立clocksource的简要过程

在系统的启动阶段,内核注册了一个基于jiffies的clocksource,代码位于kernel/time/jiffies.c:

1
2
3
4
5
6
7
8
9
10
11
12
13
14
15
16
struct clocksource clocksource_jiffies = {  
	.name       = "jiffies",  
	.rating     = 1, /* lowest valid rating*/  
	.read       = jiffies_read,  
	.mask       = 0xffffffff, /*32bits*/  
	.mult       = NSEC_PER_JIFFY << JIFFIES_SHIFT, /* details above */  
	.shift      = JIFFIES_SHIFT,  
};  
......  
  
static int __init init_jiffies_clocksource(void)  
{  
	return clocksource_register(&clocksource_jiffies);  
}  
  
core_initcall(init_jiffies_clocksource);  

它的精度只有1/HZ秒,rating值为1,如果平台的代码没有提供定制的clocksource_default_clock函数,它将返回该clocksource:

1
2
3
4
struct clocksource * __init __weak clocksource_default_clock(void)  
{  
	return &clocksource_jiffies;  
}  

然后,在初始化的后段,clocksource的代码会把全局变量curr_clocksource设置为上述的clocksource:

1
2
3
4
5
6
7
8
9
10
11
12
static int __init clocksource_done_booting(void)  
{  
		......  
	curr_clocksource = clocksource_default_clock();  
		......  
	finished_booting = 1;  
		......  
	clocksource_select();  
		......  
	return 0;  
}  
fs_initcall(clocksource_done_booting);  

当然,如果平台级的代码在初始化时也会注册真正的硬件clocksource,所以经过clocksource_select()函数后,curr_clocksource将会被设为最合适的clocksource。如果clocksource_select函数认为需要切换更好的时钟源,它会通过timekeeping_notify通知timekeeping系统,使用新的clocksource进行时间计数和更新操作。

pssh、pscp命令

http://blog.csdn.net/kumu_linux/article/details/8562320

pssh是一个python编写可以在多台服务器上执行命令的工具,同时支持拷贝文件,是同类工具中很出色的,类似pdsh,个人认为相对pdsh更为简便,使用必须在各个服务器上配置好密钥认证访问。

项目地址: https://code.google.com/p/parallel-ssh/

PSSH provides parallel versions of OpenSSH and related tools. Included are pssh, pscp, prsync, pnuke, and pslurp. The project includes psshlib which can be used within custom applications. The source code is written in Python and can be cloned from:

git clone http://code.google.com/p/parallel-ssh/

PSSH is supported on Python 2.4 and greater (including Python 3.1 and greater). It was originally written and maintained by Brent N. Chun. Due to his busy schedule, Brent handed over maintenance to Andrew McNabb in October 2009.

下载安装

下载

wget http://parallel-ssh.googlecode.com/files/pssh-2.3.1.tar.gz

本地下载 pssh-2.3.1.tar.gz

安装
1
2
3
tar xf pssh-2.3.1.tar.gz  
cd pssh-2.3.1/  
python setup.py install  
参数命令介绍

pssh 在多个主机上并行地运行命令

1
2
3
4
5
6
7
8
9
10
11
12
13
14
   -h 执行命令的远程主机列表  或者 -H user@ip:port  文件内容格式[user@]host[:port]

   -l 远程机器的用户名

   -P 执行时输出执行信息
   -p 一次最大允许多少连接
   -o 输出内容重定向到一个文件
   -e 执行错误重定向到一个文件
   -t 设置命令执行的超时时间
   -A 提示输入密码并且把密码传递给ssh
   -O 设置ssh参数的具体配置,参照ssh_config配置文件
   -x 传递多个SSH 命令,多个命令用空格分开,用引号括起来
   -X 同-x 但是一次只能传递一个命令
   -i 显示标准输出和标准错误在每台host执行完毕后

其他命令

1
2
3
4
5
6
7
pscp     传输文件到多个hosts,类似scp

pslurp   从多台远程机器拷贝文件到本地

pnuke    并行在远程主机杀进程

prsync   使用rsync协议从本地计算机同步到远程主机

实例

pssh
1
2
3
4
5
$ pssh -h ip.txt -l root chkconfig --level 2345 snmpd on  
[1] 10:59:29 [SUCCESS] ... ...  
[2] 10:59:29 [SUCCESS] ... ...  
[3] 10:59:29 [SUCCESS] ... ...  
... ...  
pscp
1
2
3
4
5
$ pscp -h ip.txt -l root /etc/snmp/snmpd.conf /etc/snmp/snmpd.conf  
[1] 11:00:42 [SUCCESS] ... ...  
[2] 11:00:42 [SUCCESS] ... ...  
[3] 11:00:42 [SUCCESS] ... ...  
... ...