http://blog.chinaunix.net/uid-20321537-id-3483405.html
一.前言
mmap的具体实现以前在学习内核时学习过,但是对于其中的很多函数是一知半解的,有些只能根据其函数名来猜测其具体的功能,在本文中,一起来重新深入理解其具体的实现。
二.mmap的用户层应用
1
void *mmap(void *start,size_t length,int prot,int flags,int fd,off_t offsize);
具体参数含义
start : 指向欲映射的内存起始地址,通常设为 NULL,代表让系统自动选定地址,映射成功后返回该地址。
返回值:
错误代码:
用户层的调用很简单,其具体功能就是直接将物理内存直接映射到用户虚拟内存,使用户空间可以直接对物理空间操作。但是对于内核层而言,其具体实现比较复杂。
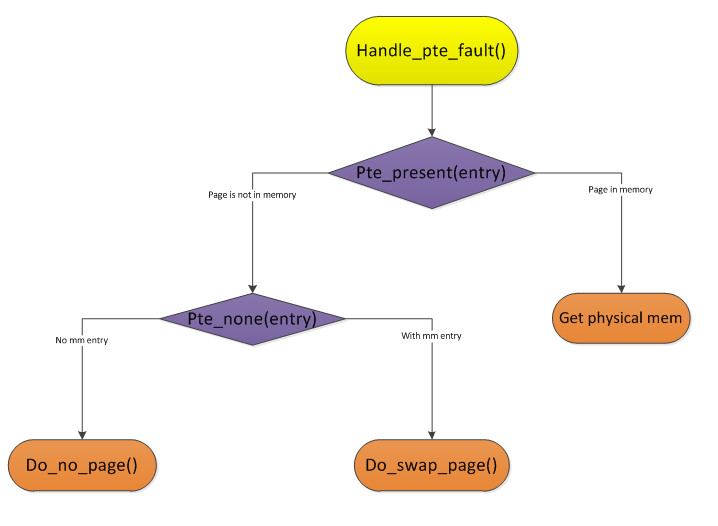
三.mmap的内核实现
对于mmap的内核有了解的都会知道用户层的mmap到内核层的mmap其中多了一个参数vma_struct这个结构体,在开始时对于这个参数很疑惑就是这个参数的值是哪儿来的,在这里我们会一一来讲述。
mmap() —> sys_mmap_pgoff() 内核系统调用函数
munmap() —>sys_munmap() 内核系统调用函数,其最终调用unmap_region()来解除映射关系,不需要对应的file_operation有unmap操作项.
还是从do_mmap开始吧。
3.1 do_mmap
参数说明:
从这里可以知道,这里面的参数几乎均是用户层传入的参数。
1
2
3
4
5
6
7
8
9
10
11
static inline unsigned long do_mmap(struct file *file, unsigned long addr,unsigned long len, unsigned long prot,
unsigned long flag, unsigned long offset)
{
unsigned long ret = -EINVAL;
if ((offset + PAGE_ALIGN(len)) < offset) --页对齐len,检测传入参数是否有误。
goto out;
if (!(offset & ~PAGE_MASK)) --检测offset是否页对齐。映射时只能映射页对齐的长度。
ret = do_mmap_pgoff(file, addr, len, prot, flag, offset >> PAGE_SHIFT);
out:
return ret;
}
3.2 do_mmap_pgoff
这个函数是巨大的。
1
2
3
4
5
6
7
8
9
10
11
12
13
14
15
16
17
18
19
20
21
22
23
24
25
26
27
28
29
30
31
32
33
34
35
36
37
38
39
40
41
42
43
44
45
46
47
48
49
50
51
52
53
54
55
56
57
58
59
60
61
62
63
64
65
66
67
68
69
70
71
72
73
74
75
76
77
78
79
80
81
82
83
84
85
86
87
88
89
90
91
92
93
94
95
96
97
98
99
100
101
102
103
104
105
106
107
108
109
unsigned long do_mmap_pgoff(struct file * file, unsigned long addr,unsigned long len, unsigned long prot,unsigned long flags, unsigned long pgoff)
{
struct mm_struct * mm = current->mm; --当前用户进程的mm
struct inode *inode;
unsigned int vm_flags;
int error;
int accountable = 1;
unsigned long reqprot = prot;
if ((prot & PROT_READ) && (current->personality & READ_IMPLIES_EXEC)) --是否隐藏了可执行属性。
if (!(file && (file->f_path.mnt->mnt_flags & MNT_NOEXEC)))
prot |= PROT_EXEC;
if (!len)
return -EINVAL;
if (!(flags & MAP_FIXED)) -
addr = round_hint_to_min(addr); --判断输入的欲映射的起始地址是否小于最小映射地址,如果小于,将addr修改为最小地址,不过前提是MAP_FIXED旗标没有设置。
error = arch_mmap_check(addr, len, flags); --不同平台对于mmap参数的不同检测。这里之间返回0
if (error)
return error;
len = PAGE_ALIGN(len); --检测len是否越界,len的范围在0~TASK_SIZE之间。
if (!len || len > TASK_SIZE)
return -ENOMEM; --错误值为nomem
if ((pgoff + (len >> PAGE_SHIFT)) < pgoff) --再次检测是否越界。我们这里不得不小心哪个晕头了传入一个莫名其妙的值
return -EOVERFLOW;
if (mm->map_count > sysctl_max_map_count) --在一个进程中对于mmap个数是有限制的。超出了还是nomem的错误。
return -ENOMEM;
addr = get_unmapped_area(file, addr, len, pgoff, flags); --获取没有映射的地址,这个是查询mm中空闲的内存地址,这个在下面理解。
if (addr & ~PAGE_MASK)
return addr;
vm_flags = calc_vm_prot_bits(prot) | calc_vm_flag_bits(flags) | mm->def_flags |
VM_MAYREAD | VM_MAYWRITE | VM_MAYEXEC; --设置vm_flags,根据传入的port和flags以及mm本身自有的旗标来设置。
if (flags & MAP_LOCKED) {
if (!can_do_mlock())
return -EPERM;
vm_flags |= VM_LOCKED;
}
if (vm_flags & VM_LOCKED) {
unsigned long locked, lock_limit;
locked = len >> PAGE_SHIFT;
locked += mm->locked_vm;
lock_limit = current->signal->rlim[RLIMIT_MEMLOCK].rlim_cur;
lock_limit >>= PAGE_SHIFT;
if (locked > lock_limit && !capable(CAP_IPC_LOCK))
return -EAGAIN;
}
--关于锁定的内存区在以后学习中再看,这里就不细看。
inode = file ? file->f_path.dentry->d_inode : NULL; --判断是否匿名映射,如果不是则赋值inode
if (file) {
switch (flags & MAP_TYPE) { --MAP_TYPE = 0x0F type的掩码
case MAP_SHARED:
if ((prot&PROT_WRITE) && !(file->f_mode&FMODE_WRITE)) --file应该被打开并允许写入。
return -EACCES;
if (IS_APPEND(inode) && (file->f_mode & FMODE_WRITE)) --不能写入一个只允许写追加的文件
return -EACCES;
if (locks_verify_locked(inode)) --确保文件没有被强制锁定。
return -EAGAIN;
vm_flags |= VM_SHARED | VM_MAYSHARE; --尝试允许其他进程共享。
if (!(file->f_mode & FMODE_WRITE)) --如果file不允许写就算了,共享也没有用啊,因为file就一直固定死了,共享也没有意义。
vm_flags &= ~(VM_MAYWRITE | VM_SHARED);
case MAP_PRIVATE:
if (!(file->f_mode & FMODE_READ))
return -EACCES;
if (file->f_path.mnt->mnt_flags & MNT_NOEXEC) {
if (vm_flags & VM_EXEC)
return -EPERM;
vm_flags &= ~VM_MAYEXEC;
}
if (is_file_hugepages(file))
accountable = 0;
if (!file->f_op || !file->f_op->mmap)
return -ENODEV;
break;
default:
return -EINVAL;
}
} else {
switch (flags & MAP_TYPE) {
case MAP_SHARED:
pgoff = 0;
vm_flags |= VM_SHARED | VM_MAYSHARE;
break;
case MAP_PRIVATE:
pgoff = addr >> PAGE_SHIFT;
break;
default:
return -EINVAL;
}
}
--上面就是对一些旗标进行检测,防止出现旗标冲突,比如我欲映射的文件不允许写,而我映射的旗标却设定是可写并可以共享的,这个就冲突了。
error = security_file_mmap(file, reqprot, prot, flags, addr, 0); --这个函数就忽略了。
if (error)
return error;
return mmap_region(file, addr, len, flags, vm_flags, pgoff,accountable); --最后一个参数为是否为大页,如果是的就为0.其余的参数都好理解。
}
3.3 get_unmapped_area
这个是获取没有被映射的内存区
1
2
3
4
5
6
7
8
9
10
11
12
13
14
15
16
17
unsigned long get_unmapped_area(struct file *file, unsigned long addr, unsigned long len,unsigned long pgoff, unsigned long flags)
{
unsigned long (*get_area)(struct file *, unsigned long,unsigned long, unsigned long, unsigned long);
get_area = current->mm->get_unmapped_area;
if (file && file->f_op && file->f_op->get_unmapped_area)
get_area = file->f_op->get_unmapped_area;
addr = get_area(file, addr, len, pgoff, flags);
if (IS_ERR_VALUE(addr))
return addr;
if (addr > TASK_SIZE - len)
return -ENOMEM;
if (addr & ~PAGE_MASK)
return -EINVAL;
return arch_rebalance_pgtables(addr, len);
}
对于get_area函数我们以arch_get_unmapped_area为例来看如何查找一个空闲的mmap area
1
2
3
4
5
6
7
8
9
10
11
12
13
14
15
16
17
18
19
20
21
22
23
24
25
26
27
28
29
30
31
32
33
34
35
36
37
38
39
40
41
42
43
44
45
46
47
48
49
50
51
52
53
54
55
unsigned long arch_get_unmapped_area(struct file *filp, unsigned long addr,unsigned long len, unsigned long pgoff, unsigned long flags)
{
struct mm_struct *mm = current->mm;
struct vm_area_struct *vma;
unsigned long start_addr;
if (len > TASK_SIZE)
return -ENOMEM;
if (flags & MAP_FIXED) --还记否这个MAP_FIXED是什么含义不?
return addr;
if (addr) {
addr = PAGE_ALIGN(addr);
vma = find_vma(mm, addr); --vma为NULL即addr的地址不在任一个VMA(vma->vm_start~vma->vm_end) addr的地址没有被映射,
而且空洞足够我们这次的映射,那么返回addr以准备这次的映射
if (TASK_SIZE - len >= addr &&(!vma || addr + len <= vma->vm_start))
return addr;
}
if (len > mm->cached_hole_size) { --如果所需的长度大于当前vma之间的空洞长度
start_addr = addr = mm->free_area_cache;
} else {
start_addr = addr = TASK_UNMAPPED_BASE; --需要的长度小于当前空洞,为了不至于时间浪费,那么从0开始搜寻,
这里的搜寻基地址TASK_UNMAPPED_BASE很重要,用户mmap的地址的基地址必须在TASK_UNMAPPED_BASE之上,
但是一定这样严格 吗?看上面的if (addr)判断,如果用户给了一个地址在TASK_UNMAPPED_BASE之下,
映射实际上还是会发生的。
mm->cached_hole_size = 0;
}
full_search:
for (vma = find_vma(mm, addr); ; vma = vma->vm_next) {
if (TASK_SIZE - len < addr) {
if (start_addr != TASK_UNMAPPED_BASE) {
addr = TASK_UNMAPPED_BASE;
start_addr = addr;
mm->cached_hole_size = 0;
goto full_search;
}
return -ENOMEM;
}
if (!vma || addr + len <= vma->vm_start) { --如果第一次find_vma返回值即为NULL ,vma没有被映射并且空洞足够映射
!vma的条件只有可能在循环的第一次满足,在其后不可能满足,在其后的判断条件即为
vma->vma_end~vma->vma_next->vma_start之间的空洞大小大于所需要映射的长度即可,
下面判断条件中的addr为vma->vma_end,而vma->vm_start为 vma->vma_next->vma_start
mm->free_area_cache = addr + len;
return addr;
}
if (addr + mm->cached_hole_size < vma->vm_start) --在循环的第一次如果vma不为NULL,不会满足下面的条件,在以后循环中mm->cached_hole_size
则为该次vma->vm_start 与上一次的vma->vm_end之间的差值
mm->cached_hole_size = vma->vm_start - addr;
addr = vma->vm_end;
}
}
还记否以前看的红黑树,这里就现实的用了红黑树的算法。关于这个我们就不看了。
1
2
3
4
5
6
7
8
9
10
11
12
13
14
15
16
17
18
19
20
21
22
23
24
25
26
27
28
struct vm_area_struct * find_vma(struct mm_struct * mm, unsigned long addr)
{
struct vm_area_struct *vma = NULL;
if (mm) {
vma = mm->mmap_cache;
if (!(vma && vma->vm_end > addr && vma->vm_start <= addr)) {
struct rb_node * rb_node;
rb_node = mm->mm_rb.rb_node;
vma = NULL;
while (rb_node) {
struct vm_area_struct * vma_tmp;
vma_tmp = rb_entry(rb_node,struct vm_area_struct, vm_rb);
if (vma_tmp->vm_end > addr) {
vma = vma_tmp;
if (vma_tmp->vm_start <= addr)
break;
rb_node = rb_node->rb_left;
} else
rb_node = rb_node->rb_right;
}
if (vma)
mm->mmap_cache = vma;
}
}
return vma;
}
3.4 mmap_region
1
2
3
4
5
6
7
8
9
10
11
12
13
14
15
16
17
18
19
20
21
22
23
24
25
26
27
28
29
30
31
32
33
34
35
36
37
38
39
40
41
42
43
44
45
46
47
48
49
50
51
52
53
54
55
56
57
58
59
60
61
62
63
64
65
66
67
68
69
70
71
72
73
74
75
76
77
78
79
80
81
82
83
84
85
86
87
unsigned long mmap_region(struct file *file, unsigned long addr,unsigned long len, unsigned long flags,
unsigned int vm_flags, unsigned long pgoff,int accountable)
{
struct mm_struct *mm = current->mm;
struct vm_area_struct *vma, *prev;
struct vm_area_struct *merged_vma;
int correct_wcount = 0;
int error;
struct rb_node **rb_link, *rb_parent;
unsigned long charged = 0;
struct inode *inode = file ? file->f_path.dentry->d_inode : NULL;
/* Clear old maps */
error = -ENOMEM;
munmap_back:
vma = find_vma_prepare(mm, addr, &prev, &rb_link, &rb_parent); --函数find_vma_prepare()与find_vma()基本相同,它扫描当前进程地址空间的vm_area_struct
结构所形成的红黑树,试图找到结束地址高于addr的第一个区间;如果找到了一个虚拟区,
说明addr所在的虚拟区已经在使用,也就是已经有映射存在,因此要调用do_munmap()
把这个老的虚拟区从进程地址空间中撤销,如果撤销不成功,就返回一个负数;
如果撤销成功,就继续查找,直到在红黑树中找不到addr所在的虚拟区
if (vma && vma->vm_start < addr + len) {
if (do_munmap(mm, addr, len))
return -ENOMEM;
goto munmap_back;
}
if (!may_expand_vm(mm, len >> PAGE_SHIFT)) -- 页数和超过限定值返回 0 ,不超过返回1
return -ENOMEM;
if (flags & MAP_NORESERVE) -- 如果flags参数中没有设置MAP_NORESERVE标志,新的虚拟区含有私有的可写页,空闲页面数小于要映射的虚拟区
的大小;则函数终止并返回一个负数;其中函数security_vm_enough_memory()用来检查一个
进程的地址空间中是否有足够的内存来进行一个新的映射
vm_flags |= VM_NORESERVE;
if (accountable && (!(flags & MAP_NORESERVE) ||
sysctl_overcommit_memory == OVERCOMMIT_NEVER)) {
if (vm_flags & VM_SHARED) {
/* Check memory availability in shmem_file_setup? */
vm_flags |= VM_ACCOUNT;
} else if (vm_flags & VM_WRITE) {
charged = len >> PAGE_SHIFT;
if (security_vm_enough_memory(charged))
return -ENOMEM;
vm_flags |= VM_ACCOUNT;
}
}
if (!file && !(vm_flags & VM_SHARED)) { --如果是匿名映射(file为空),并且这个虚拟区是非共享的,则可以把这个虚拟区和与它紧挨的前一个虚拟区进行合并;
虚拟区的合并是由vma_merge()函数实现的。如果合并成功,则转out处,请看后面out处的代码。
vma = vma_merge(mm, prev, addr, addr + len, vm_flags,
NULL, NULL, pgoff, NULL);
if (vma)
goto out;
}
vma = kmem_cache_zalloc(vm_area_cachep, GFP_KERNEL);
if (!vma) {
error = -ENOMEM;
goto unacct_error;
}
vma->vm_mm = mm;
vma->vm_start = addr;
vma->vm_end = addr + len;
vma->vm_flags = vm_flags;
vma->vm_page_prot = vm_get_page_prot(vm_flags);
vma->vm_pgoff = pgoff;
if (file) {
error = -EINVAL;
if (vm_flags & (VM_GROWSDOWN|VM_GROWSUP))
goto free_vma;
if (vm_flags & VM_DENYWRITE) {
error = deny_write_access(file);
if (error)
goto free_vma;
correct_wcount = 1;
}
vma->vm_file = file;
get_file(file);
error = file->f_op->mmap(file, vma); -- (⊙o⊙)哦 ,终于可以调用设备文件中真正的mmap
if (error)
goto unmap_and_free_vma;
if (vm_flags & VM_EXECUTABLE)
added_exe_file_vma(mm);
} else if (vm_flags & VM_SHARED) {
error = shmem_zero_setup(vma);// it will call shmem_file_setup(), the same way as called in ashmem.c
if (error)
goto free_vma;
}
如果建立的是从文件到虚存区间的映射,则:
1.当参数flags中的VM_GROWSDOWN或VM_GROWSUP标志位为1时,说明这个区间可以向低地址或高地址扩展,但从文件映射的区间不能进行扩展,因此转到free_vma,释放给vm_area_struct分配的Slab,并返回一个错误;
2.当flags中的VM_DENYWRITE标志位为1时,就表示不允许通过常规的文件操作访问该文件,所以要调用deny_write_access()排斥常规的文件操作(参见第八章)。
3.get_file()函数的主要作用是递增file结构中的共享计数;
4.每个文件系统都有个fiel_operation数据结构,其中的函数指针mmap提供了用来建立从该类文件到虚存区间进行映射的操作,这是最具有实质意义的函数;对于大部分文件系统,这个函数为generic_file_mmap( )函数实现的,该函数执行以下操作:
(1)初始化vm_area_struct结构中的vm_ops域。如果VM_SHARED标志为1,就把该域设置成file_shared_mmap, 否则就把该域设置成file_private_mmap。从某种意义上说,这个步骤所做的事情类似于打开一个文件并初始化文件对象的方法。
(2)从索引节点的i_mode域(参见第八章)检查要映射的文件是否是一个常规文件。如果是其他类型的文件(例如目录或套接字),就返回一个错误代码。
(3)从索引节点的i_op域中检查是否定义了readpage( )的索引节点操作。如果没有定义,就返回一个错误代码。
(4)调用update_atime( )函数把当前时间存放在该文件索引节点的i_atime域中,并将这个索引节点标记成脏。
5.如果flags参数中的MAP_SHARED标志位为1,则调用shmem_zero_setup()进行共享内存的映射。
1
2
3
4
5
6
7
8
9
10
11
12
13
14
15
16
17
18
19
20
21
22
23
24
25
if ((vm_flags & (VM_SHARED|VM_ACCOUNT)) == (VM_SHARED|VM_ACCOUNT))
vma->vm_flags &= ~VM_ACCOUNT;
addr = vma->vm_start;
pgoff = vma->vm_pgoff;
vm_flags = vma->vm_flags;
if (vma_wants_writenotify(vma))
vma->vm_page_prot = vm_get_page_prot(vm_flags & ~VM_SHARED);
merged_vma = NULL;
if (file)
merged_vma = vma_merge(mm, prev, addr, vma->vm_end,
vma->vm_flags, NULL, file, pgoff, vma_policy(vma));
if (merged_vma) {
mpol_put(vma_policy(vma));
kmem_cache_free(vm_area_cachep, vma);
fput(file);
if (vm_flags & VM_EXECUTABLE)
removed_exe_file_vma(mm);
vma = merged_vma;
} else {
vma_link(mm, vma, prev, rb_link, rb_parent);
file = vma->vm_file;
}
此时,把新建的虚拟区插入到进程的地址空间,这是由函数vma_link()完成的,该函数具有三方面的功能:
函数atomic_inc(x)给*x加1,这是一个原子操作。在内核代码中,有很多地方调用了以atomic为前缀的函数。原子操作,在操作过程中不会被中断。
1
2
3
4
5
6
7
8
9
10
11
12
13
14
15
16
17
18
19
20
21
22
23
24
25
26
27
28
29
	if (correct_wcount)
		atomic_inc(&inode->i_writecount);
out:
	mm->total_vm += len >> PAGE_SHIFT;
	vm_stat_account(mm, vm_flags, file, len >> PAGE_SHIFT);
	if (vm_flags & VM_LOCKED) {
		long nr_pages = mlock_vma_pages_range(vma, addr, addr + len);
		if (nr_pages < 0)
			return nr_pages;    /* vma gone! */
		mm->locked_vm += (len >> PAGE_SHIFT) - nr_pages;
	} else if ((flags & MAP_POPULATE) && !(flags & MAP_NONBLOCK))
		make_pages_present(addr, addr + len);
	return addr;

unmap_and_free_vma:
	if (correct_wcount)
		atomic_inc(&inode->i_writecount);
	vma->vm_file = NULL;
	fput(file);

	unmap_region(mm, vma, prev, vma->vm_start, vma->vm_end);
	charged = 0;
free_vma:
	kmem_cache_free(vm_area_cachep, vma);
unacct_error:
	if (charged)
		vm_unacct_memory(charged);
	return error;
}
ok!到此mmap的内核核心就可以了,关于具体的mmap的实现,以后再看。
四.总结
mmap的实质是什么,其实就是从每一个进程中的用户空间分配一段空间用于映射。 这里面的机关重重,需要好好理解,不过谨记一点,进程的vma_struct是采用了红黑树来管理的。对于每一段的内存区都会有一个vma_struct 来描述,比如数据区,code区等等,以及mmap所需要的一段内存区。
五.其它
1、特点:
① 进程相关的
2、使用
系统调用mmap()用于共享内存的两种方式:
典型调用代码如下:
1
2
fd=open(name, flag, mode); if(fd<0) ...
ptr=mmap(NULL, len , PROT_READ|PROT_WRITE, MAP_SHARED , fd , 0);
通过mmap()实现共享内存的通信方式有许多特点和要注意的地方,可以参看UNIX网络编程第二卷。【3】
(2)使用特殊文件提供匿名内存映射:
3、说明
(1)
1
void *mmap(void *addr, size_t len, int prot, int flag, int fd, off_t offset );
把文件或设备映射或解除映射到内存中
0)flag:必须有MAP_SHARED 标志
1)start:指向欲映射的内存起始地址,通常设为 NULL,代表让系统自动选定地址,映射成功后返回该地址。
2)length:代表将文件中多大的部分映射到内存。
3)offset 必须是页面大小的整数倍。页面大小由 getpagesize(2)得到。
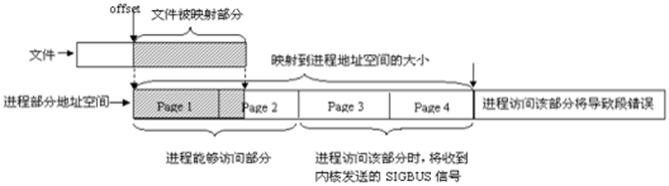
4)被映射的文件大小应是页面大小的整数倍。如一个文件大小不是页面大小的整数倍,映射时多出来的区域将被赋为0,对这些区域的写不会被写回到文件中。
5)munmap()系统调用将删除指定地址范围内的映射区域。随后对这个范围内区域的引用将产生非法的内存引用。当这个进程终止后,这个区域也会被删除。另一方面,关闭文件描述符并不会删除映射区域。
6)fd:要映射到内存中的文件描述符。如果使用匿名内存映射时,即flags中设置了MAP_ANONYMOUS,fd设为-1。有些系统不支持匿名内存映射,则可以使用fopen打开/dev/zero文件,然后对该文件进行映射,可以同样达到匿名内存映射的效果。
7)若映射成功则返回映射区的内存起始地址,否则返回MAP_FAILED(-1)。
(2) munmap
1
int munmap( void * addr, size_t len )
在进程地址空间中解除一个映射关系,当映射关系解除后,对原来映射地址的访问将导致段错误发生。
void * addr :调用mmap()时返回的地址
(3)
1
int msync ( void * addr , size_t len, int flags)
一般说来,进程在映射空间的对共享内容的改变并不直接写回到磁盘文件中,往往在调用munmap()后才执行该操作。可以调用msync()实现磁盘上文件与共享内存区的内容一致。
void * addr :调用mmap()时返回的地址
5、其他
1)进程调用mmap()时,只是在进程空间内新增了一块相应大小的缓冲区,并设置了相应的访问标识,但并没有建立进程空间到物理页面的映射。因此,第一次访问该空间时,会引发一个缺页异常。
2)一个共享内存区域可以看作是特殊文件系统shm中的一个文件,shm的安装点在交换区上。
3)mmap()系统调用使得进程之间通过映射同一个普通文件实现共享内存。普通文件被映射到进程地址空间后,进程可以向访问普通内存一样对文件进行访问,不必再调用read(),write()等操作。
4)最终被映射文件的内容的长度不会超过文件本身的初始大小,即映射不能改变文件的大小。文件被映射部分而不是整个文件决定了进程能够访问的空间大小,另外,如果指定文件的偏移部分,一定要注意为页面大小的整数倍。