1 2 3 4 | |
https://zhuanlan.zhihu.com/p/42403181
https://blog.csdn.net/phmatthaus/article/details/109443056
1 2 3 4 5 6 7 8 9 10 11 12 13 14 15 16 17 18 19 20 21 22 23 24 25 26 27 28 29 30 31 32 33 34 35 36 37 38 39 40 41 42 43 44 45 46 47 48 49 | |


1 2 3 4 | |
https://zhuanlan.zhihu.com/p/42403181
https://blog.csdn.net/phmatthaus/article/details/109443056
1 2 3 4 5 6 7 8 9 10 11 12 13 14 15 16 17 18 19 20 21 22 23 24 25 26 27 28 29 30 31 32 33 34 35 36 37 38 39 40 41 42 43 44 45 46 47 48 49 | |
Mysql ERROR 1032 (HY000): Can’t find record in xxx
先删除 UNIQUE KEY 还原后载加回来
1
| |
https://blog.csdn.net/yangshuainan/article/details/122037791
备份后,还原时出现 Mysql ERROR 1032 (HY000): Can’t find record in xxx,排查数据后并没有发现什么问题。
百度查到文章:MySQL: Can’t find record in tablename - Database Administrators Stack Exchange

1
| |
修复后问题解决。
修复前请记得备份要修复的表防止数据丢失,切记!!。
MySQL数据库中 .frm 和 .myi 和 .myd 和 .ibd 文件是什么文件?
在data目录下会看到3类文件:.frm、.myi、.myd
(1).frm–表定义,是描述表结构的文件。
(2).MYD–"D"数据信息文件,是表的数据文件。
(3).MYI–"I"索引信息文件,是表数据文件中任何索引的数据树
在data目录下会看到2类文件:.frm、.ibd
(1).frm–表结构的文件。
(2).ibd–表数据和索引的文件。该表的索引(B+树)的每个非叶子节点存储索引,叶子节点存储索引和索引对应的数据。
https://www.cnblogs.com/jimojianghu/p/15993027.html
在我们进行前端开发时,针对项目优化,常会提到一条:针对较小图片,合理使用Base64字符串替换内嵌,可以减少页面http请求。 并且还会特别强调下,必须是小图片,大小不要超过多少KB,等等。
那么,Base64又到底是什么呢?
下面的这段字符串,应该是大家都很常见的。通过这种固定的格式,来表示一张图片,并被浏览器识别,可以完整的展示出图片:
1
| |
这里展示的是一个svg格式的图片,当然我们还可以加载任何浏览器支持的格式的图片。
这段字符串就是基于Base64编码得来的,其中base64,后面那一长串的字符串,就是Base64编码字符串。
互联网发展早起,电子邮件是最有效的应用。
而电子邮件的SMTP传输协议在早期,只能用于传送7位的ASCII码,而ASCII码就是基于英语设计的,对于非英语国家的文字等资源就无法发送。
为了解决这个问题,后来有了通用互联网邮件扩充MIME,增加了邮件的主体结构,定义了非ASCII码的编码传输规则,这就是Base64。
关于字符编码的知识,请查看前端开发中需要搞懂的字符编码知识
Base64是基于64个可打印字符来表示二进制数据的编解码方式。
正因为可编解码,所以它主要的作用不在于安全性,而在于让内容能在各个网关间无错的传输。
这64个可打印字符包括大写字母A-Z、小写字母a-z、数字0-9共62个字符,再加上另外2个 + 和 /。
Base64是一种索引编码,每个字符都对应一个索引,具体的关系图,如下:
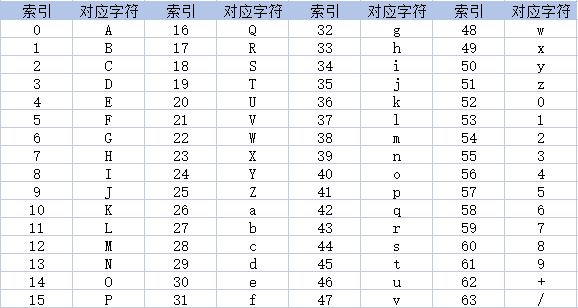
这也是名称中64的由来。
由于64等于2的6次方,所以一个Base64字符实际上代表着6个二进制位(bit)。
然而,二进制数据1个字节(byte)对应的是8比特(bit),因此,3字节(3 x 8 = 24比特)的字符串/二进制数据正好可以转换成4个Base64字符(4 x 6 = 24比特)。
为什么是3个字节一组呢? 因为6和8的最小公倍数是24,24比特正好是3个字节。
具体的编码方式:
1 2 3 4 5 | |
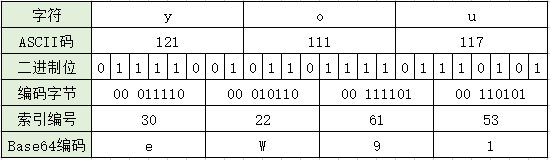
上图中的字符串 ‘you',经过转换后,得到的编码为: 'eW91'。
我们可以看到,当3个字符进行Base64转换编码后,最后变成了4个字符。因为每个6比特位,都补了2个0,变成8比特位,对应1字节。
这里正好多了三分之一,所以正常情况下,Base64编码的数据体积通常比原数据的体积大三分之一。
这也是为什么我们在前面讲使用Base64编码优化图片时,需要强调是小图标,如果图片都使用该方式,则静态文件会增大很多,并不合适。
3个英文字符,正好能转成4个Base64字符。那如果字符长度不是3的倍数,那应该使用什么样的规则呢?
其实也简单,我们在实际使用Base编码时,常会发现有第65个字符的存在,那就是 ‘=’ 符号,这个等于号就是针对这种特殊情况的一种处理方式。
对于不足3个字节的地方,实际都会在后面补0,直到有24个二进制位为止。
但要注意的是,在计算字节数时,会直接使用总长度除以3,如果余数为1则会直接在最后补一个=,如果余数为2则补两个=。
因此,转码后的字符串需要补的后缀等号,要么是1个,要么是2个,具体的可以见下图:
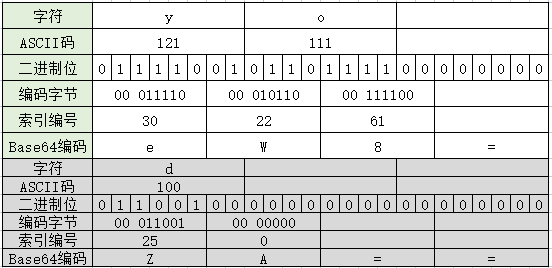
图中第二个,使用的是单独的字符 ’d',是为了区分索引字符表里的索引0,这个时候,得到编码中,会存在一个索引0对应的A字符,而'=‘是直接补上2个。
由于 Base64 仅可对 ASCII 字符进行编码,如果是中文字符等非ASCII码,就需要先将中文字符转换为ASCII字符后,再进行编码才行。
JavaScript提供了两个原生方法,用来处理Base64编码:btoa() 和 atob()。
btoa(): 将字符串或二进制值转换成Base64编码字符串。
注意:btoa方法只能直接处理ASCII码的字符,对于非ASCII码的字符,则会报错。
atob(): 对base64 编码的字符串进行解码。
注意:atob方法如果传入字符串参数不是有效的Base64编码(如非ASCII码字符),或者其长度不是4的倍数,会报错。
1 2 3 4 5 | |
由于btoa、atob 仅支持对ASCII字符编码,也就是单字节字符,而我们平时的中文都是 2-4 字节的字符。
因此,可以先将中文字符转为 utf-8 的编码,将utf-8编码当做字符,这样就可以对多个单字节字符进行编码。
对于中文可以使用这两个方法: encodeURIComponent() 和 decodeURIComponent()。
1 2 3 | |
如下,编解码中文的方式:
1 2 3 4 5 | |
js-base64
接下来,我们了解下前端开发中常见的对Base64编码的一些使用场景。
Base64在前端方面的应用,多数都是针对图片的处理,一般都是基于DataURL的方式来使用。
Data URL 由 data:前缀、MIME类型(表明数据类型)、base64标志位(如果是文本,则可选)以及 数据本身 四部分组成。
具体的格式:data:[<mime type>][;base64],<data>。
这里的第四部分 <data> 数据本身,就是一个Base64字符串。
即开篇说的针对图片优化,使用Base64能减少请求数的,可以在img标签下,或者css中:
1
| |
1 2 3 | |
当我们使用vue或react框架时,也可以通过url-loader来配置,图标转Base64的大小:
1 2 3 4 5 | |
Web环境下,有提供 FileReader 的API,用来读取文件的数据,可以通过它的 readAsDataURL() 方法,将文件数据读取为Base64编码的字符串数据:
1 2 3 4 5 | |
该方法常用在图片上传中。
Canvas本质上是一个位图图像,它有提供 toDataURL() 方法,将画布导出生成为一张图片,该图片将以Base64编码的格式进行保存。
1 2 | |
处理图片展示外,还会在特殊数据传输、简单编码和加密、代码混淆、部分证书中,见到Base64编码字符串。
最后再来总结一下Base64的特点:
将二进制数据转为字符串(ASCII码),方便数据传输。
浏览器能直接展示Base64编码图片,减少请求。
编码后数据会大至少三分之一,需要额外的方法处理编解码。