http://www.kkx.net/soft/33716.html
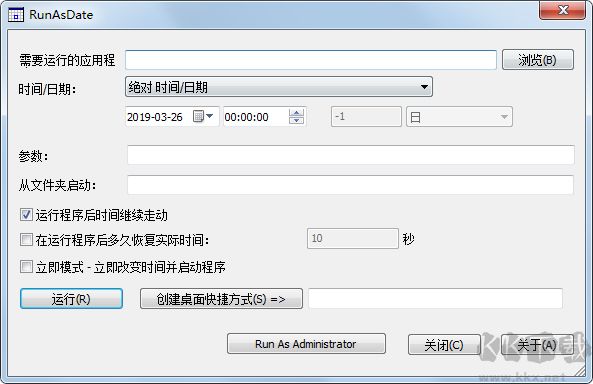
RunAsDate中文版是一款可以让你的程序、软件以指定日期运行的软件,比如现在是2022年,你可以让软件启动于2020年,这样一些试用软件就不会检测到过期了~你也无需去修改系统时间,甚至你还可以建立运行在特定日期时间的快捷方式,到时直接运行即可


http://www.kkx.net/soft/33716.html
RunAsDate中文版是一款可以让你的程序、软件以指定日期运行的软件,比如现在是2022年,你可以让软件启动于2020年,这样一些试用软件就不会检测到过期了~你也无需去修改系统时间,甚至你还可以建立运行在特定日期时间的快捷方式,到时直接运行即可
https://blog.csdn.net/s2603898260/article/details/115773153
https://blog.csdn.net/u014044624/article/details/106596000
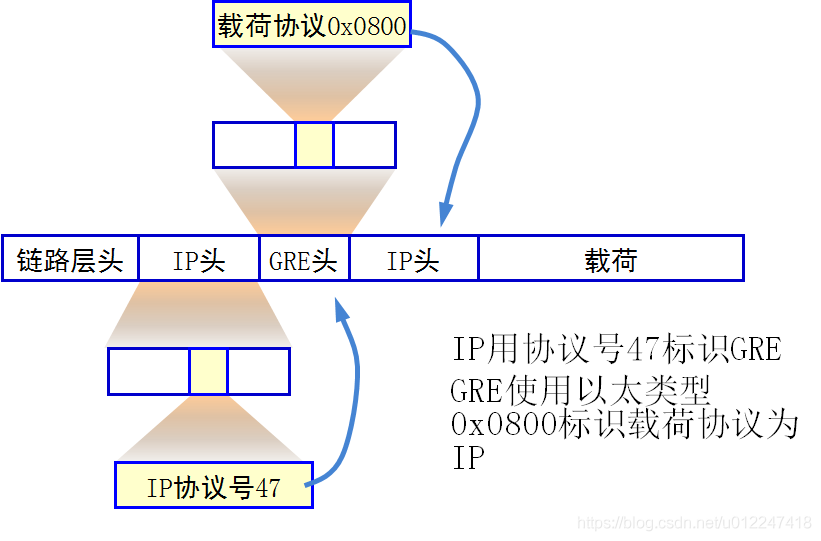
GRE(Generic Routing Encapsulation,通用路由封装)协议是对某些网络层协议(如IP 和IPX)的数据报文进行封装,使这些被封装的数据报文能够在另一个网络层协议(如IP)中传输。
在大多数常规情况下,系统拥有一个有效载荷(或负载)包,需要将它封装并发送至某个目的地。首先将有效载荷封装在一个 GRE 包中,然后将此 GRE 包封装在其它某协议中并进行转发。此外发协议即为发送协议。当 IPv4 被作为 GRE 有效载荷传输时,协议类型字段必须被设置为 0x800 。当一个隧道终点拆封此含有 IPv4 包作为有效载荷的 GRE 包时, IPv4 包头中的目的地址必须用来转发包,并且需要减少有效载荷包的 TTL 。值得注意的是,在转发这样一个包时,如果有效载荷包的目的地址就是包的封装器(也就是隧道另一端),就会出现回路现象。在此情形下,必须丢弃该包。当 GRE 包被封装在 IPv4 中时,需要使用 IPv4 协议 47 。
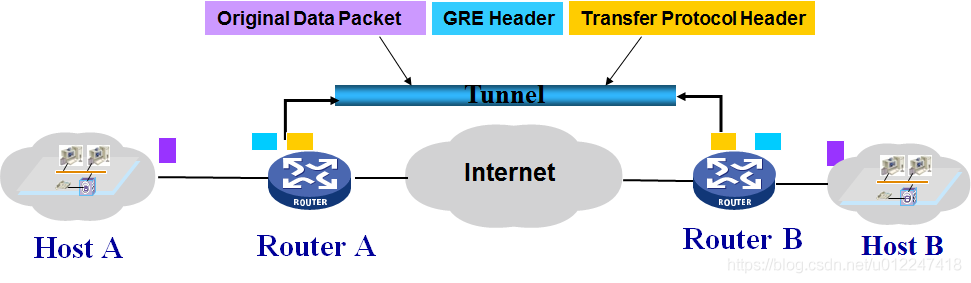
GRE采用了Tunnel(隧道)技术,是VPN(Virtual Private Network)的第三层隧道协议。Tunnel 是一个虚拟的点对点的连接,提供了一条通路使封装的数据报文能够在这个通路上传输,并且在一个Tunnel 的两端分别对数据报进行封装及解封装。
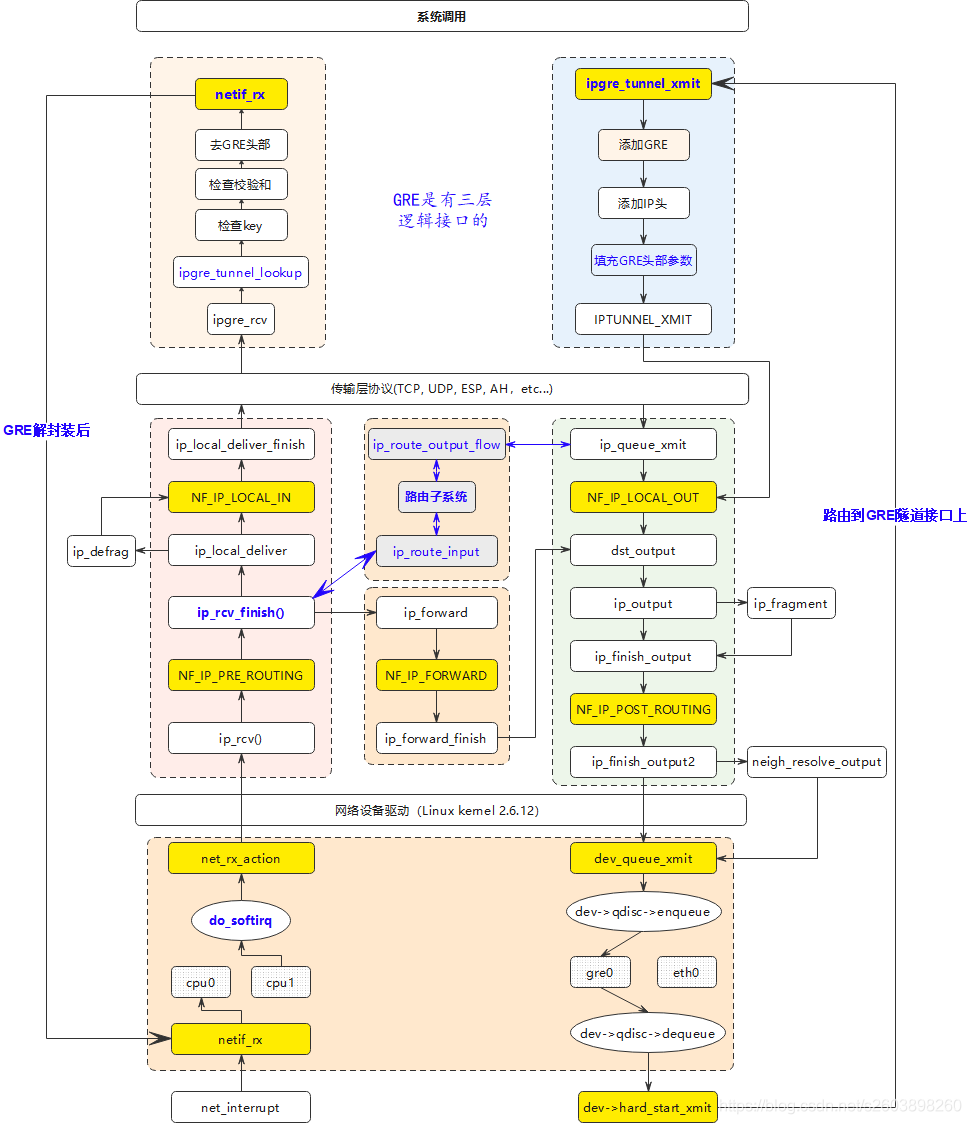
发送过程是很简单的,因为 router A 上配置了一条路由规则,凡是发往 10.0.2.0 网络的包都要经过 netb 这个 tunnel 设备,在内核中经过 forward 之后就最终到达这个 GRE tunnel 设备的 ndo_start_xmit(),也就是 ipgre_tunnel_xmit() 函数。这个函数所做的事情无非就是通过 tunnel 的 header_ops 构造一个新的头,并把对应的外部 IP 地址填进去,最后发送出去。
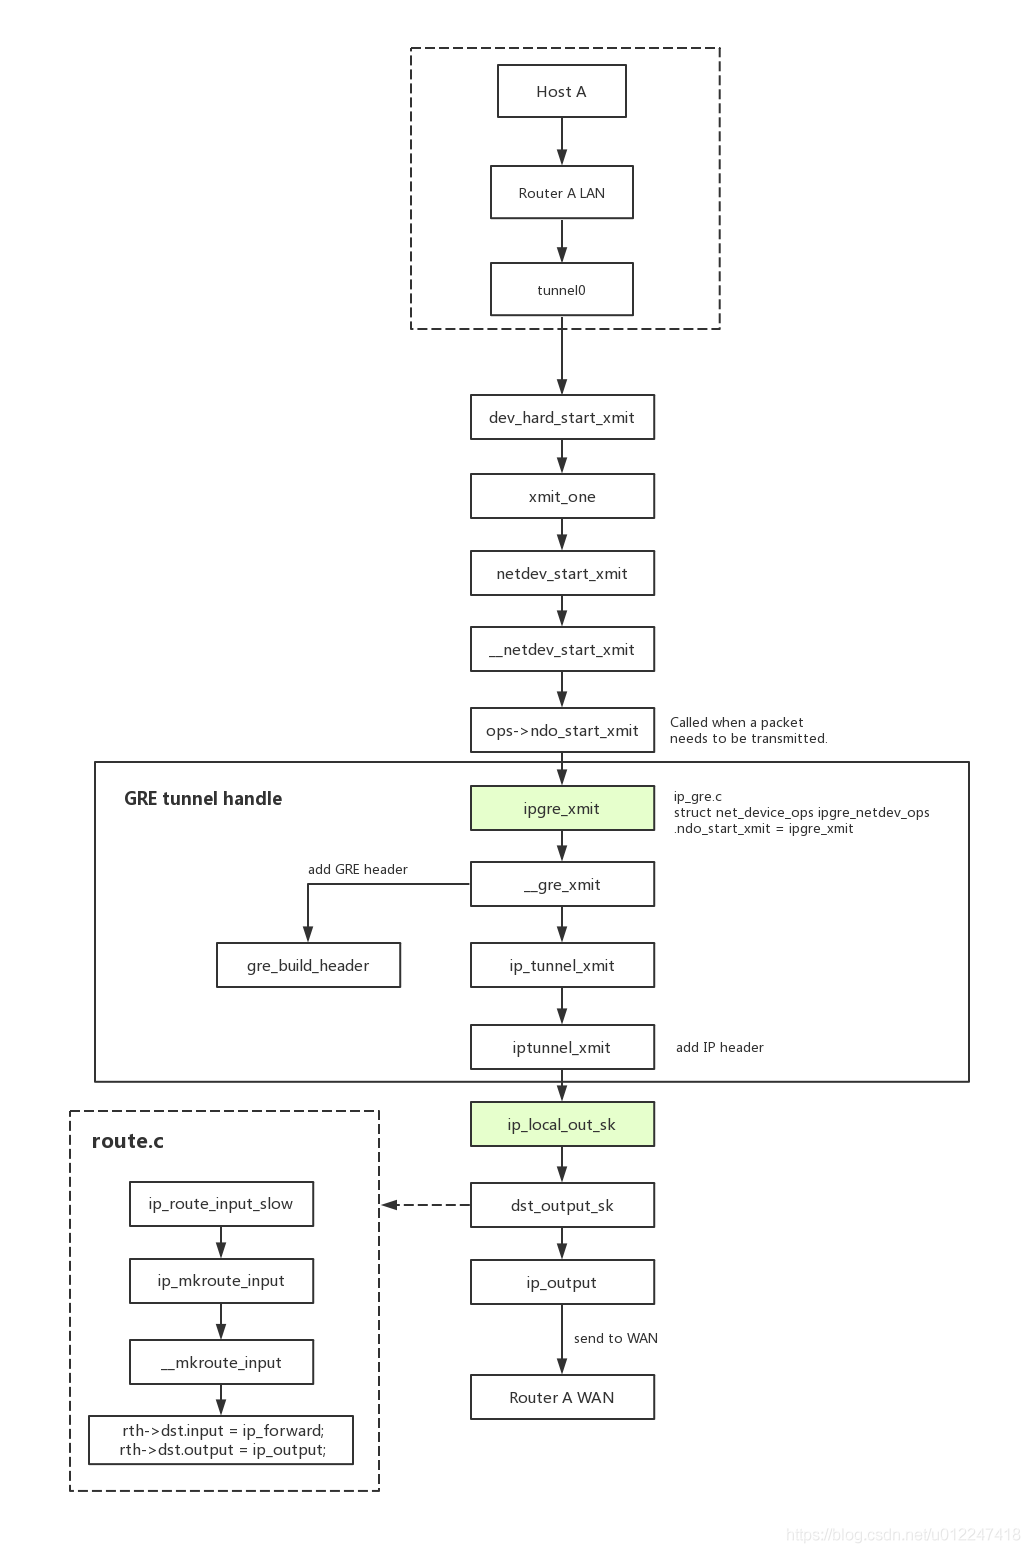
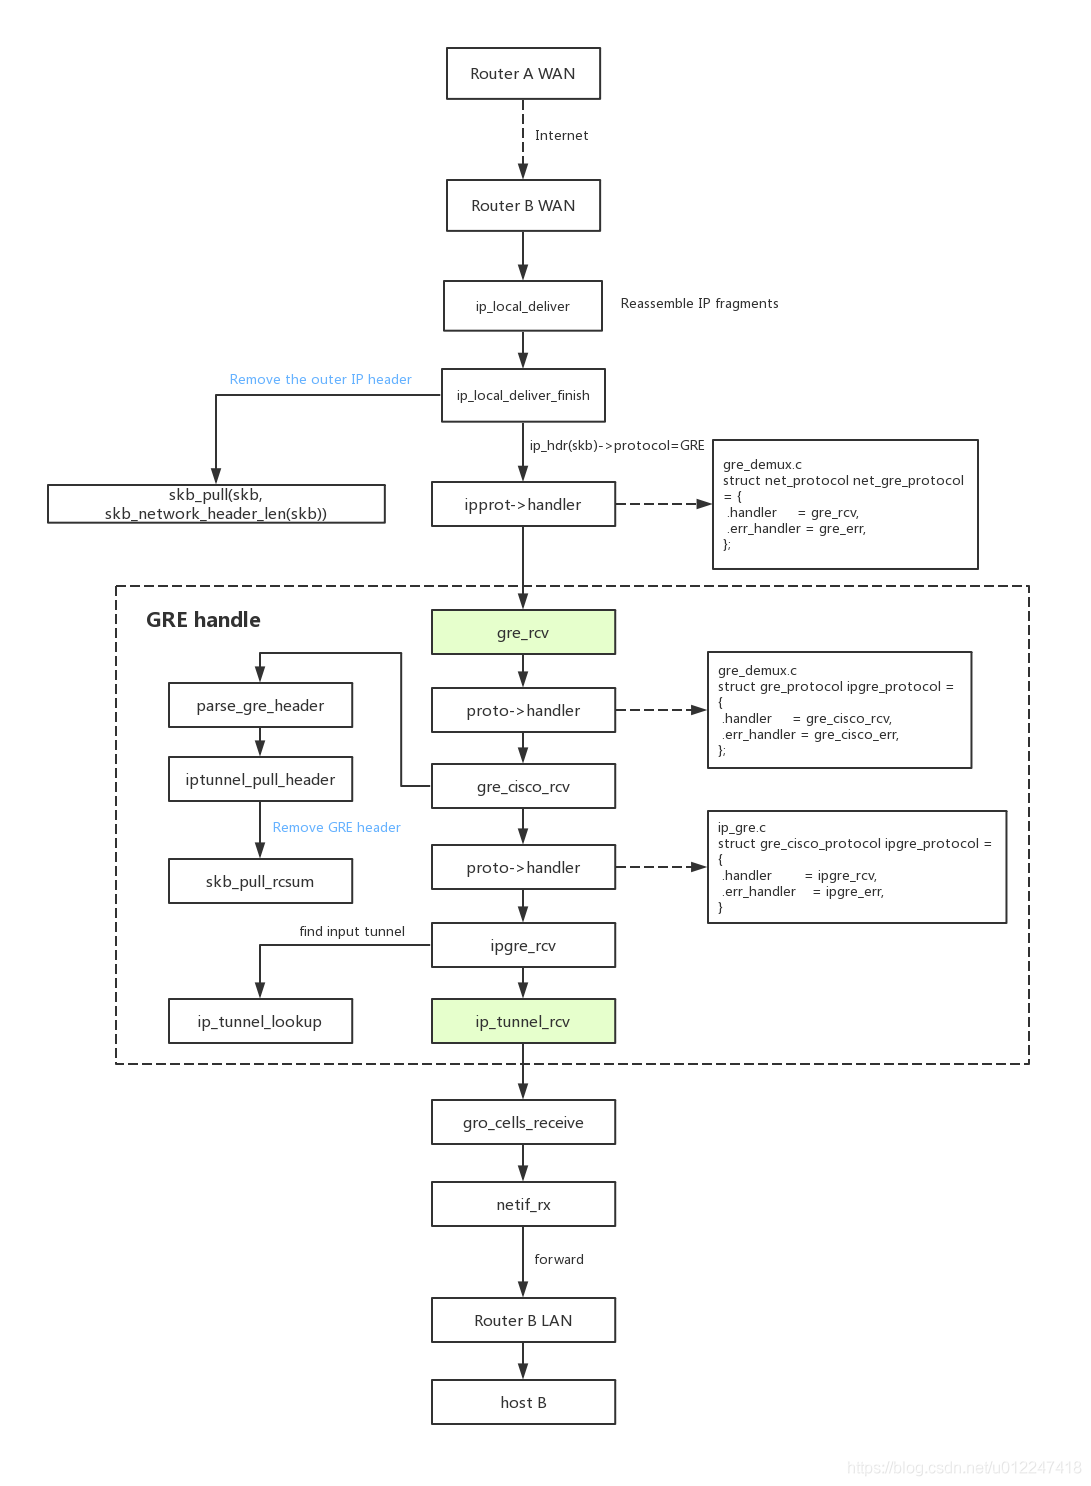
接收过程,即 router B 上面进行的操作。这里需要指出的一点是,GRE tunnel 自己定义了一个新的 IP proto,也就是 IPPROTO_GRE。当 router B 收到从 router A 过来的这个包时,它暂时还不知道这个是 GRE 的包,它首先会把它当作普通的 IP 包处理。因为外部的 IP 头的目的地址是该路由器的地址,所以它自己会接收这个包,把它交给上层,到了 IP 层之后才发现这个包不是 TCP,UDP,而是 GRE,这时内核会转交给 GRE 模块处理。
ipgre_rcv() 所做的工作是:通过外层IP 头找到对应的 tunnel,然后剥去外层 IP 头,把这个“新的”包重新交给 IP 栈去处理,像接收到普通 IP 包一样。到了这里,“新的”包处理和其它普通的 IP 包已经没有什么两样了:根据 IP 头中目的地址转发给相应的 host。
注:在这里可以把gre当做L4层协议。
http://bbs.chinaunix.net/thread-4082396-1-1.html
连接跟踪,顾名思义,就是识别一个连接上双方向的数据包,同时记录状态。下面看一下它的数据结构:
1 2 3 4 5 6 7 8 9 10 11 12 13 14 15 16 17 18 19 20 21 22 | |
这个结构非常简单,其中最主要的就是tuplehash(跟踪连接双方向数据)和status(记录连接状态),这也连接跟踪最主要的功能。
在status中可以设置的标志,由下面的enum ip_conntrack_status描述,它们可以共存。这些标志设置后就不会再被清除。
1 2 3 4 5 6 7 8 9 10 11 12 13 14 15 16 17 18 19 20 | |
连接跟踪对该连接上的每个数据包表现为以下几种状态之一,由enum ip_conntrack_info表示,被设置在skb->nfctinfo中。
1 2 3 4 5 6 7 8 9 | |
以上就是连接跟踪里最重要的数据结构了,用于跟踪连接、记录状态、并对该连接的每个数据包设置一种状态。
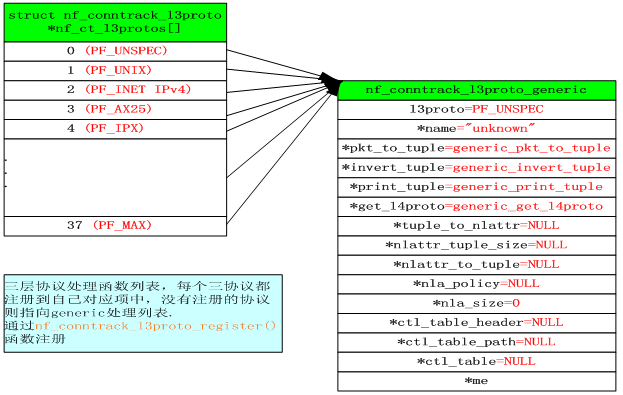
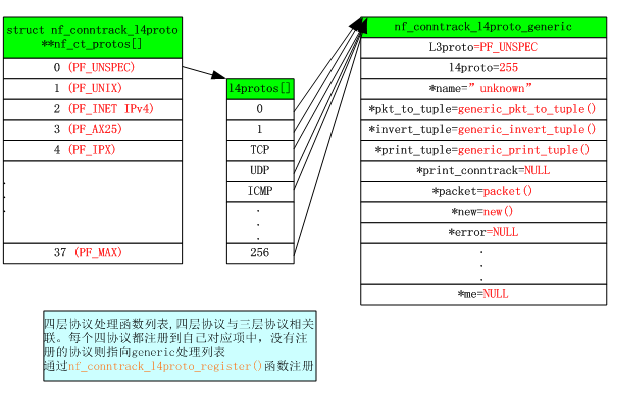
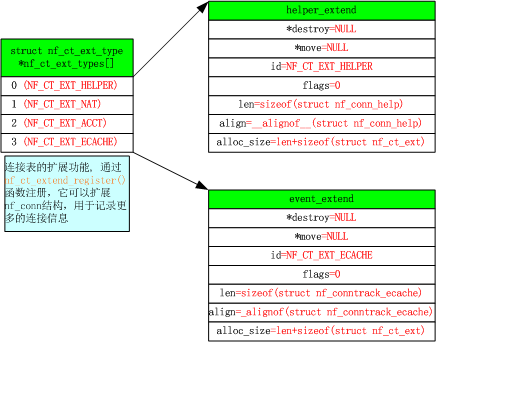
除了上面的主要数据结构外,还有一些辅助数据结构,用于处理不同协议的私有信息、处理子连接、对conntrack进行扩展等。
利用nf_conntrack_proto.c文件中的
1 2 3 | |
在nf_ct_l3protos[]数组中注册自己的三层协议处理函数。
利用nf_conntrack_proto.c文件中的
1 2 3 | |
在nf_ct_protos[]数组中注册自己的四层协议处理函数。
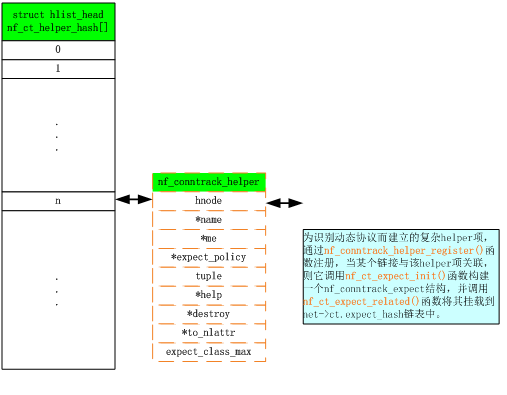
利用nf_conntrack_helper.c文件中的
1
| |
来注册nf_conntrack_helper结构,
和nf_conntrack_expect.c文件中的
1
| |
来注册nf_conntrack_expect结构。
利用nf_conntrack_extend.c文件中的
1 2 3 | |
进行扩展,并修改连接跟踪相应代码来利用这部分扩展功能。
了解了上面的数据结构,我们下面来看一下nf_conntrack的执行流程以及如何利用这些数据结构的。首先来看一下nf_conntrack模块加载时的初始化流程。
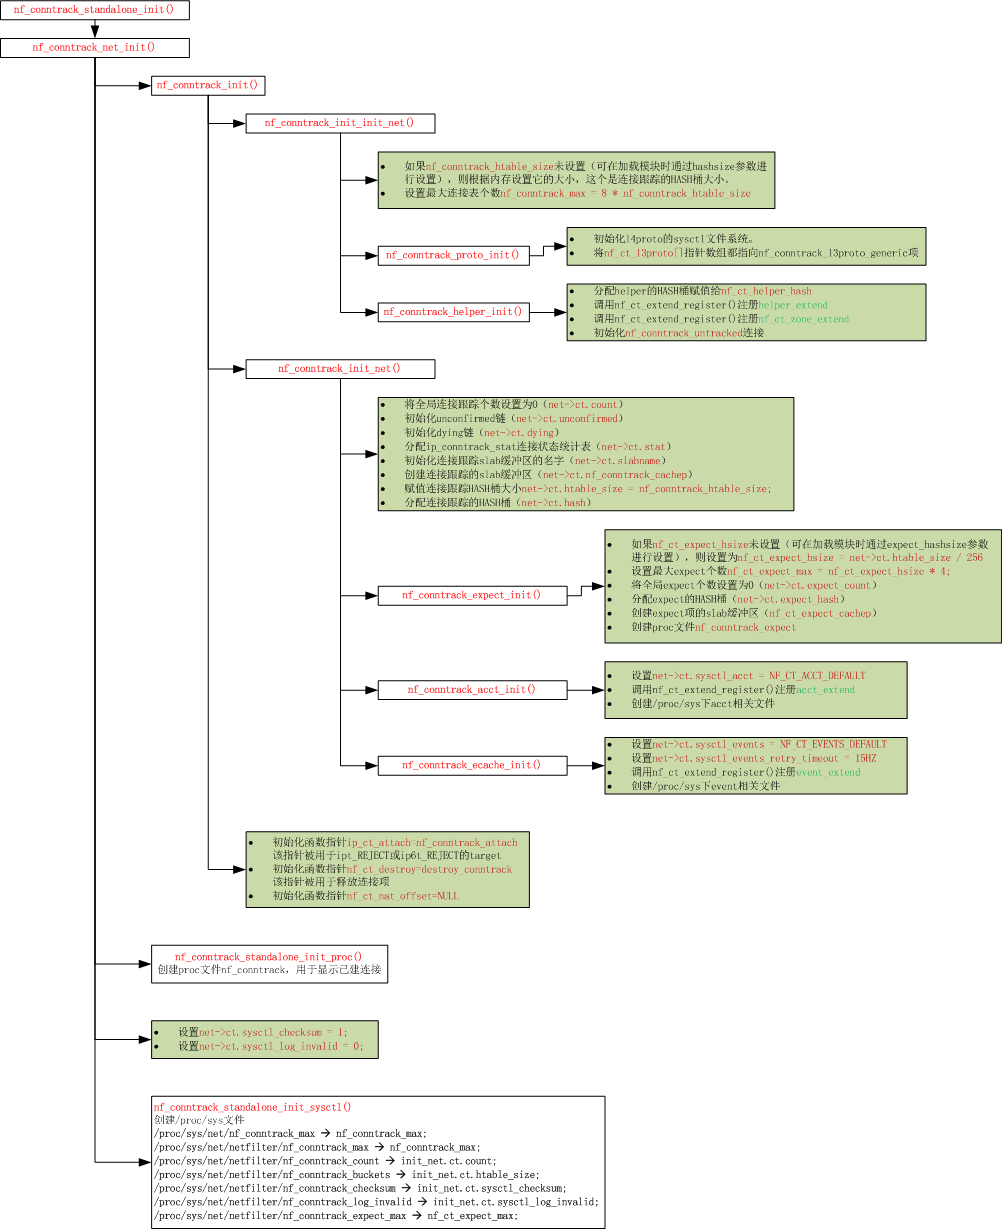
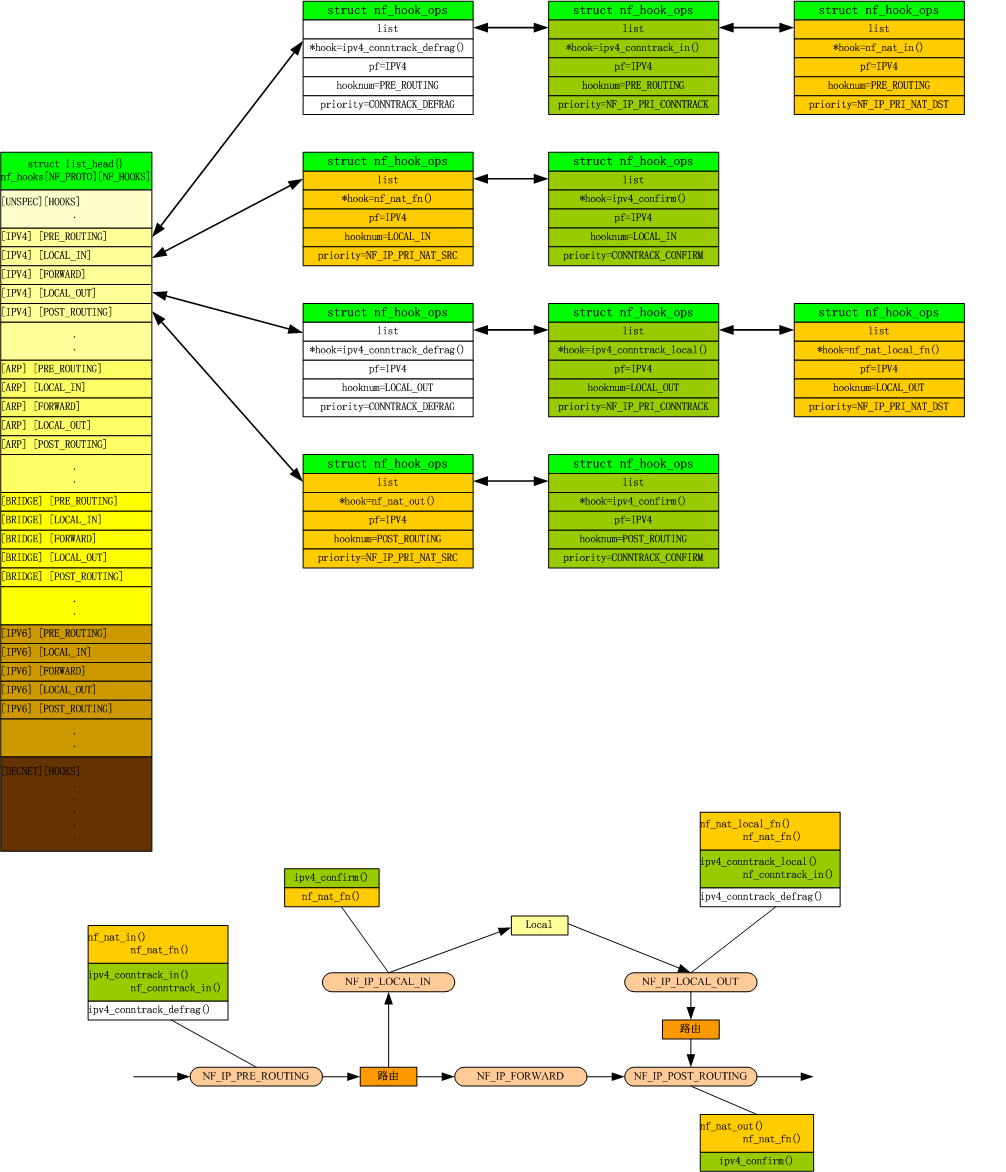
就是初始化上面提到的那些数据结构,它在内核启动时调用nf_conntrack_standalone_init()函数进行初始化的。初始化完成后,构建出如下图所示的结构图,只是不包含下图中与连接有关的信息(nf_conn和nf_conntrack_expect结构)。
上图中有三个HASH桶,ct_hash、expect_hash、helper_hash这三个HASH桶大小在初始化时就已确定,后面不能再更改。其中ct_hash、expect_hash可在加载nf_conntrack.ko模块时通过参数hashsize和expect_hashsize进行设定,而helper_hash不能通过参数修改,它的默认值是page/sizeof(helper_hash)。
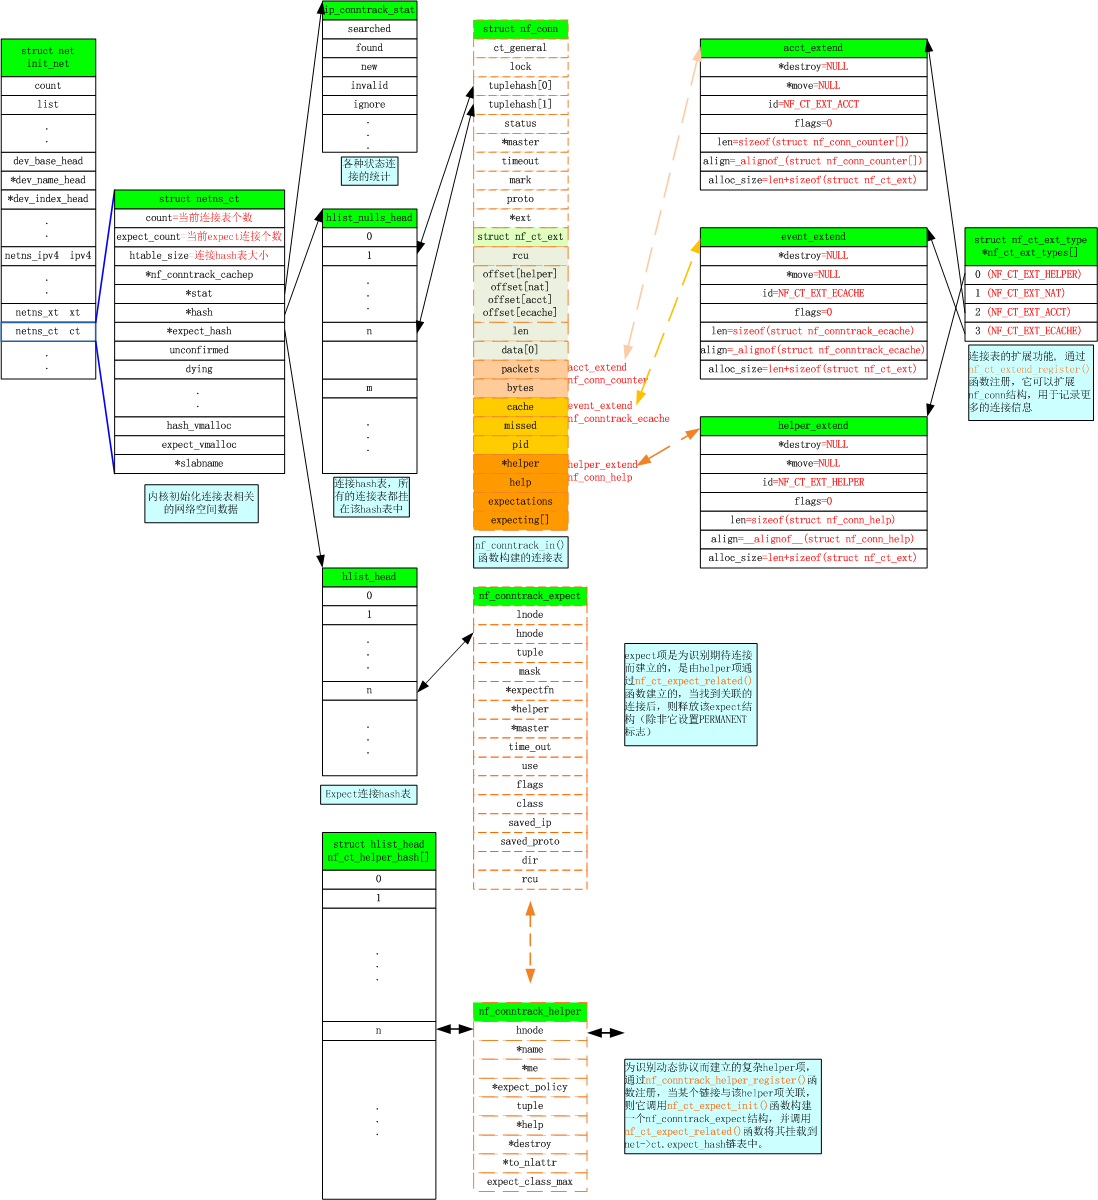
下面再来看一个当创建子连接时,各个数据结构之间的关系。
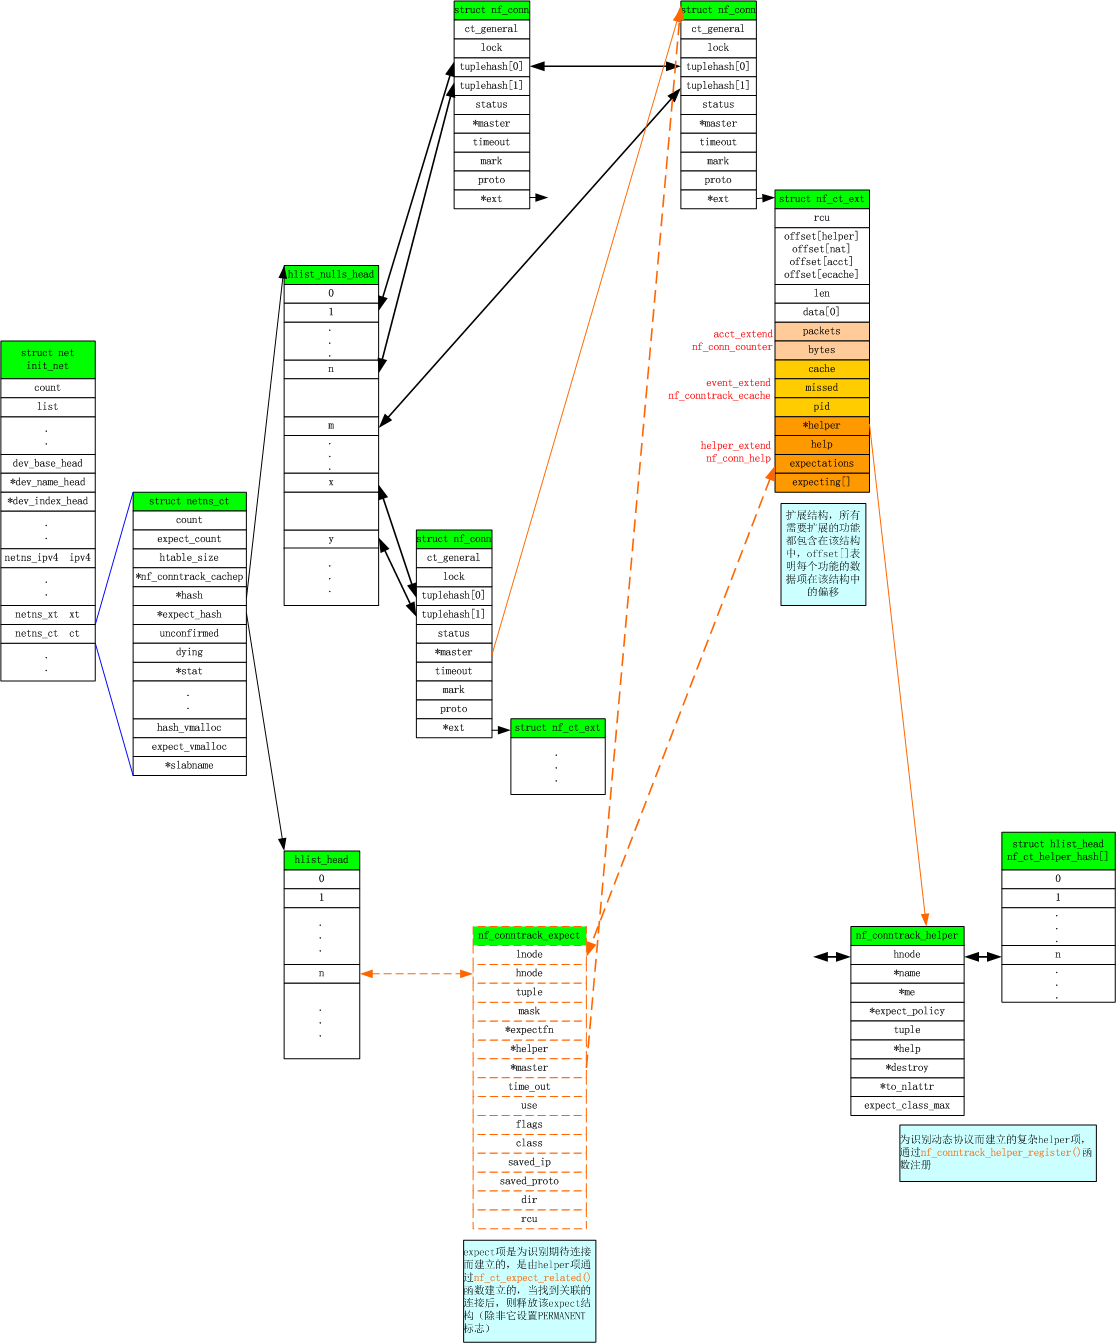
nf_conn和nf_conntrack_expect都有最大个数限制。nf_conn通过全局变量nf_conntrack_max限制,可通过 /proc/sys/net/netfilter/nf_conntrack_max 文件在运行时修改。nf_conntrack_expect通过全局变量nf_ct_expect_max限制,可通过 /proc/sys/net/netfilter/nf_conntrack_expect_max 文件在运行时修改。nf_conntrack_helper没有最大数限制,因为这个是通过注册不同协议的模块添加的,大小取决于动态协议跟踪模块的多少,一般不会很大。
上面两幅数据结构图中,大部分都已介绍过,下面介绍一下netns_ct数据结构,该结构主要用于linux的网络命名空间,表示nf_conntrack在不同的命名空间中都有一套独立的数据信息(这是另一个话题,这里就不再深入讨论了)。
1 2 3 4 5 6 7 8 9 10 11 12 13 14 15 16 17 18 19 20 21 22 23 24 | |
从nf_conntrack的框架来看,它可用于跟踪任何三层和四协议的连接,但目前在三层协议只实现了IPv4和IPv6的连接跟踪,下面我们以IPv4为例,介绍一下该协议是如何利用nf_conntrack框架和netfilter实现连接跟踪的。有关netfilter框架,可参考我的另一个帖子
首先介绍一下IPv4协议连接跟踪模块的初始化。
Ipv4连接跟踪模块注册了自己的3层协议,和IPv4相关的三个4层协议TCP、UDP、ICMP。注册后的结构图如下图所示:

在netfilter框架中利用
1
| |
函数注册自己的钩子项,调用nf_conntrack_in()函数来建立相应连接。
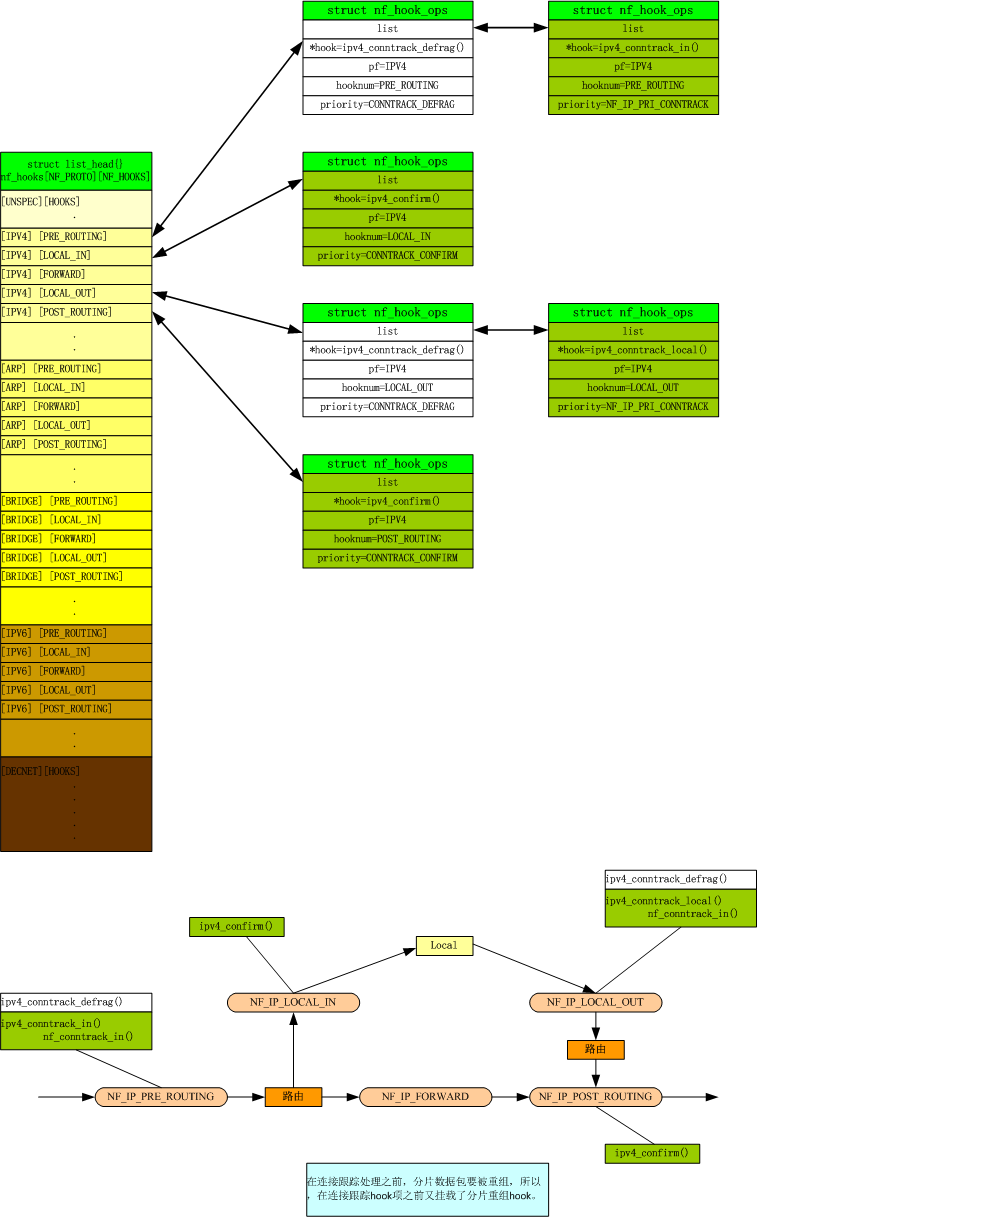
这样数据包就会经过ipv4注册的钩子项,并调用nf_conntrack_in()函数建立连接表项,连接表项中的tuple由ipv4注册的3/4层协议处理函数构建。
ipv4_conntrack_in() 挂载在NF_IP_PRE_ROUTING点上。该函数主要功能是创建链接,即创建struct nf_conn结构,同时填充struct nf_conn中的一些必要的信息,例如链接状态、引用计数、helper结构等。
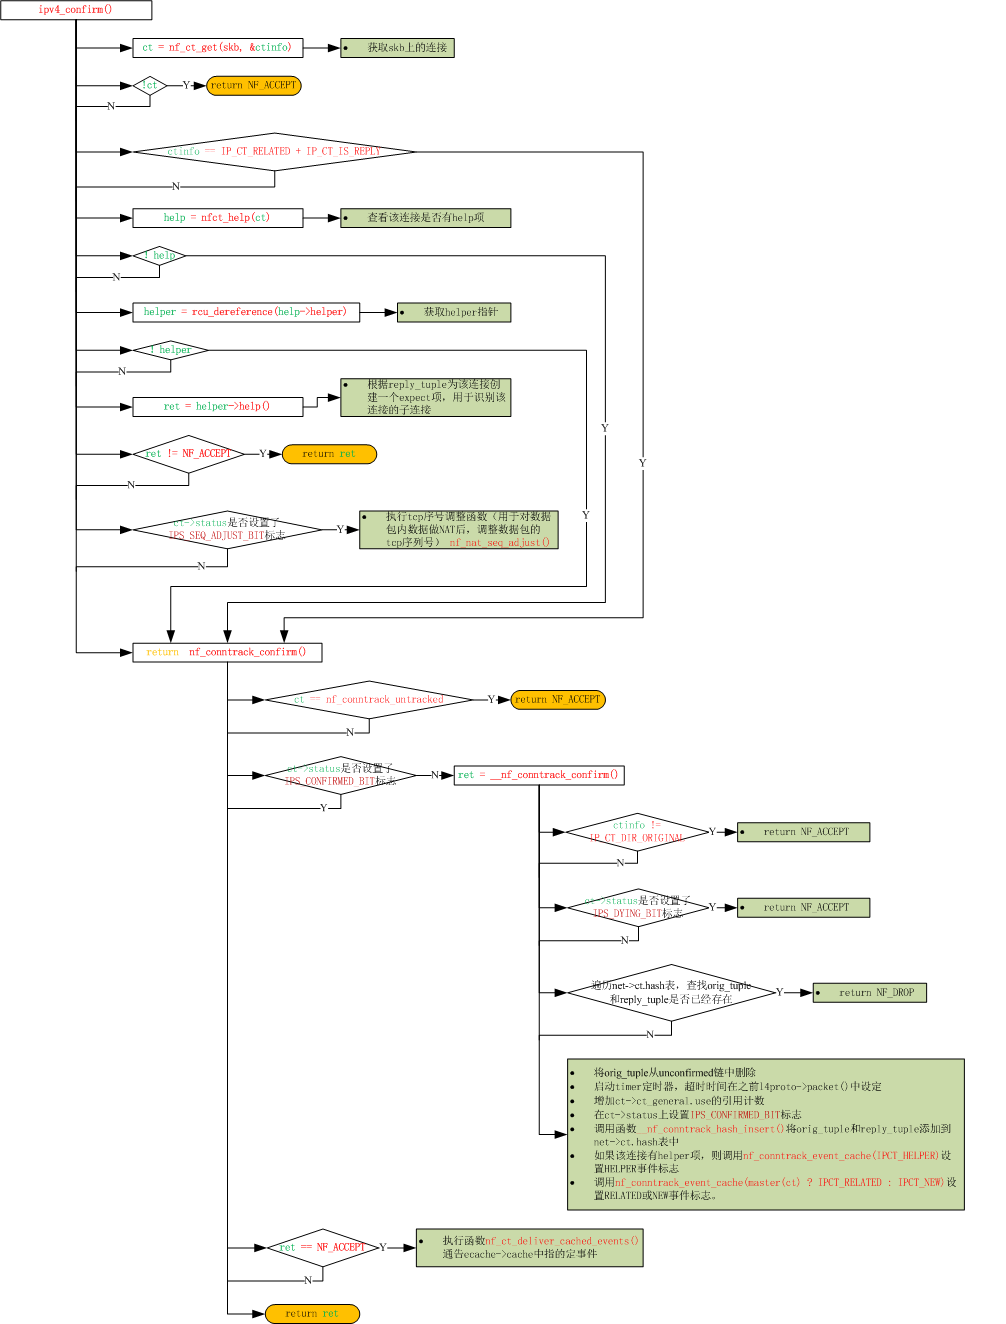
ipv4_confirm() 挂载在NF_IP_POST_ROUTING和NF_IP_LOCAL_IN点上。该函数主要功能是确认一个链接。对于一个新链接,在ipv4_conntrack_in()函数中只是创建了struct nf_conn结构,但并没有将该结构挂载到链接跟踪的Hash表中,因为此时还不能确定该链接是否会被NF_IP_FORWARD点上的钩子函数过滤掉,所以将挂载到Hash表的工作放到了ipv4_confirm()函数中。同时,子链接的helper功能也是在该函数中实现的。
ipv4_conntrack_local() 挂载在NF_IP_LOCAL_OUT点上。该函数功能与ipv4_conntrack_in()函数基本相同,但其用来处理本机主动向外发起的链接。
nf_conntrack_ipv4_compat_init() –> register_pernet_subsys() –> ip_conntrack_net_init() 创建/proc文件ip_conntrack和ip_conntrack_expect
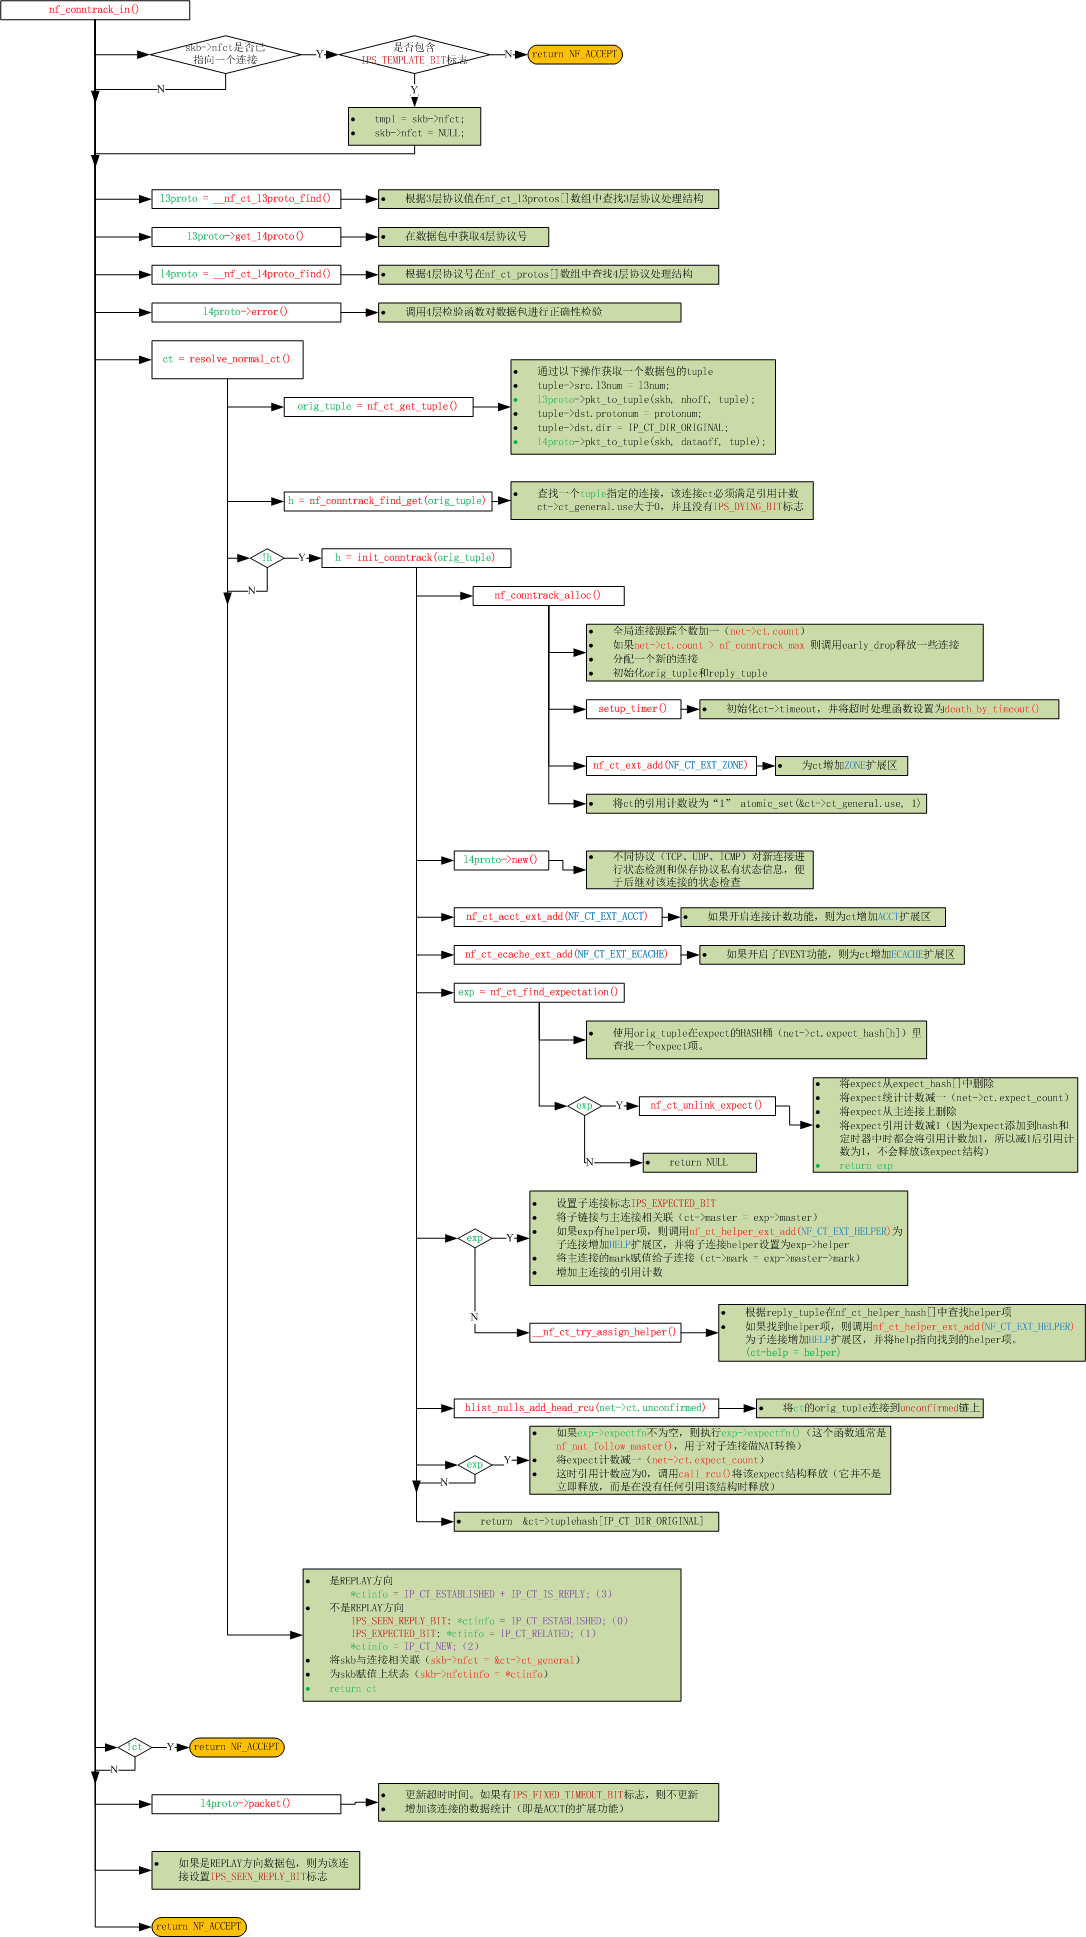
如上面所示,IPv4连接跟踪模块已初始化完成,下面我们来看一下它创建连接的流程图。上图中连接的建立主要由三个函数来完成,即ipv4_conntrack_in(),ipv4_confirm()与ipv4_conntrack_local()。其中ipv4_conntrack_in()与ipv4_conntrack_local()都是通过调用函数nf_conntrack_in()来实现的,所以下面我们主要关注nf_conntrack_in()与ipv4_confirm()这两个函数。nf_conntrack_in()函数主要完成创建链接、添加链接的扩展结构(例如helper, acct结构)、设置链接状态等。ipv4_confirm()函数主要负责确认链接(即将链接挂入到正式的链接表中)、执行helper函数、启动链接超时定时器等。另外还有一个定时器函数death_by_timeout(), 该函数负责链接到期时删除该链接。
nf_conntrack_in()函数流程图
ipv4_confirm()函数流程图
death_by_timeout()函数流程图
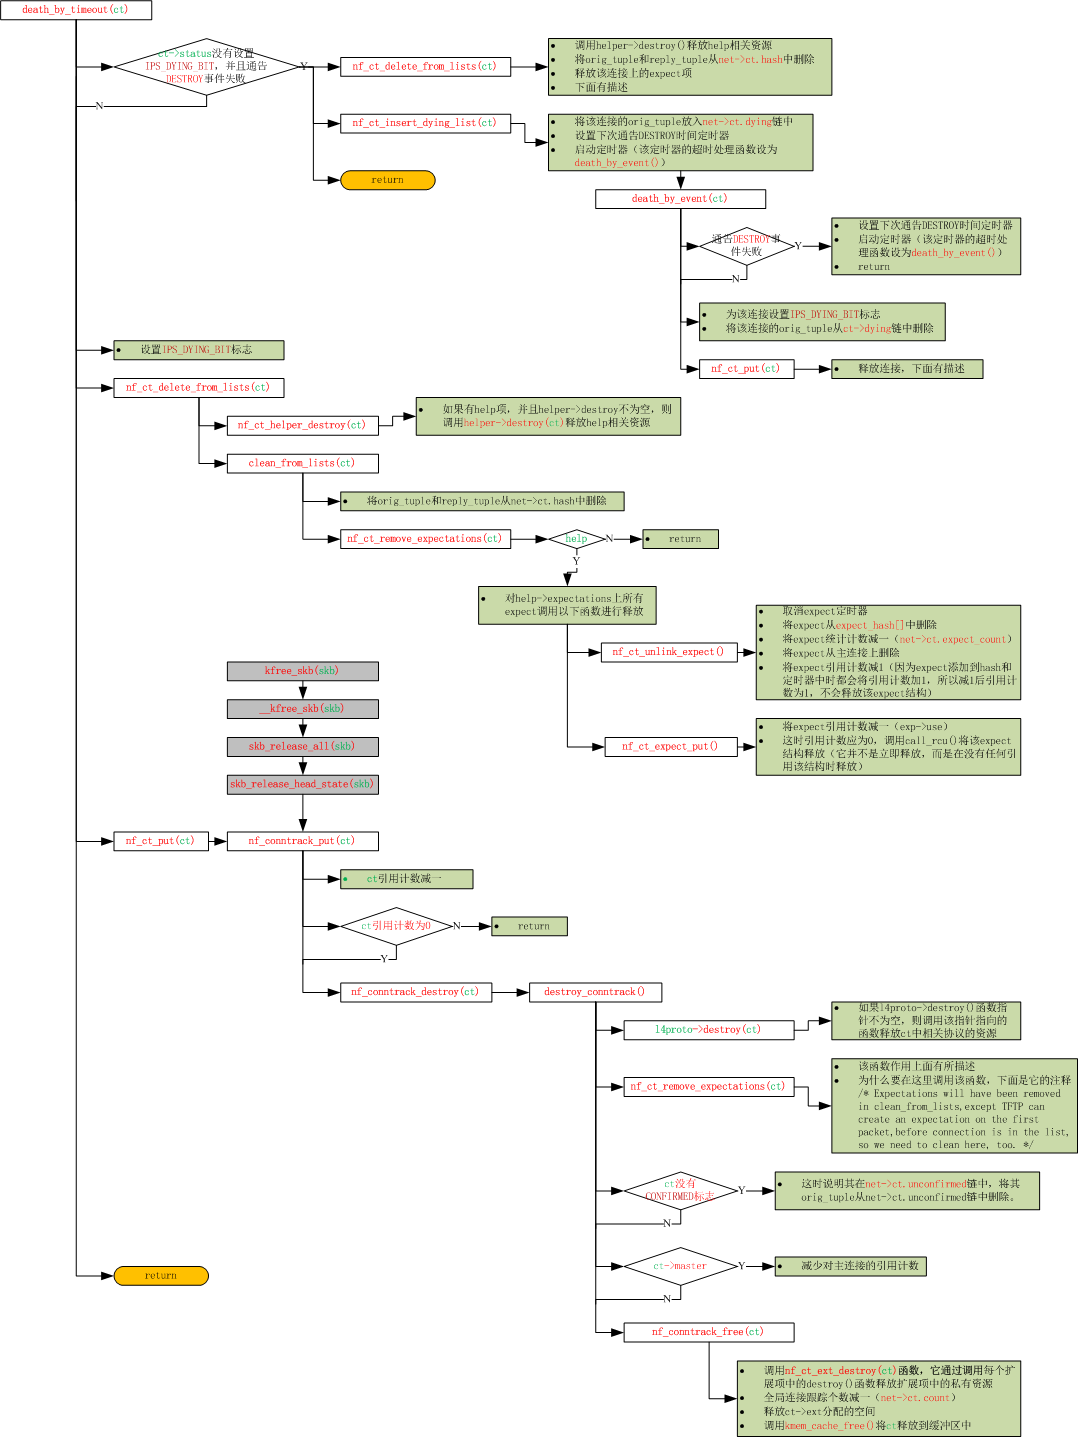
上图中有一点需要说明,由于skb会引用nf_conn,同时会增加它的引用计数,所以当skb被释放时,也要释放nf_conn的引用计数,并且在nf_conn引用计数为0时,要释放全部资源。
当数据包经过nf_conntrack_in()和ipv4_confirm()函数处理流程后,就会建立起3楼第二幅结构图所示的连接nf_conn。同时这两个函数已经包含了子连接的处理流程,即流程图中help和exp的处理。子连接建立后的结构图如3楼第三幅结构图,主链接与子连接通过helper和expect关联起来。
连接跟踪到此就介绍完了,下面介绍IPv4基于nf_conntrack框架适合实现NAT转换的。先介绍IPv4-NAT初始化的资源,然后处理流程。
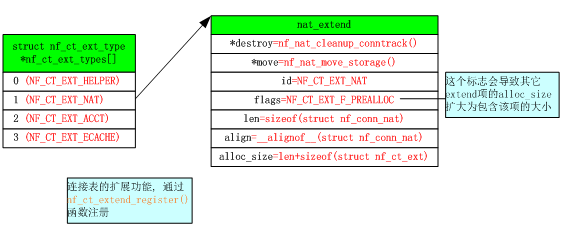
调用nf_ct_extend_register() 注册一个连接跟踪的扩展功能。
调用register_pernet_subsys() –> nf_nat_net_init() 创建net->ipv4.nat_bysource的HASH表,大小等于net->ct.htable_size。
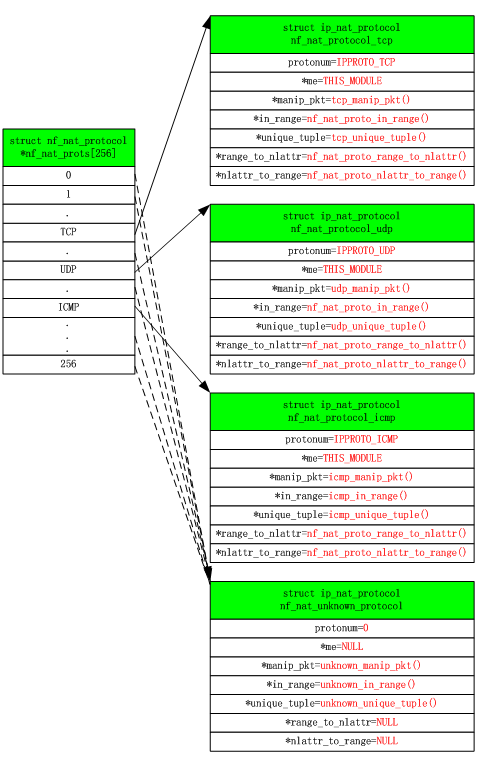
初始化nf_nat_protos[]数组,为TCP、UDP、ICMP协议指定专用处理结构,其它协议都指向默认处理结构。
为nf_conntrack_untracked连接设置IPS_NAT_DONE_MASK标志。
将NAT模块的全局变量l3proto指向IPV4协议的nf_conntrack_l3proto结构。
设置全局指针nf_nat_seq_adjust_hook指向nf_nat_seq_adjust()函数。
设置全局指针nfnetlink_parse_nat_setup_hook指向nfnetlink_parse_nat_setup()函数。
设置全局指针nf_ct_nat_offset指向nf_nat_get_offset()函数。
调用nf_nat_rule_init() –> nf_nat_rule_net_init()在iptables中注册一个NAT表(通过ipt_register_table()函数,参考另一个帖子iptables)
调用 nf_nat_rule_init() 注册SNAT target和DNAT target(通过xt_register_target()函数)
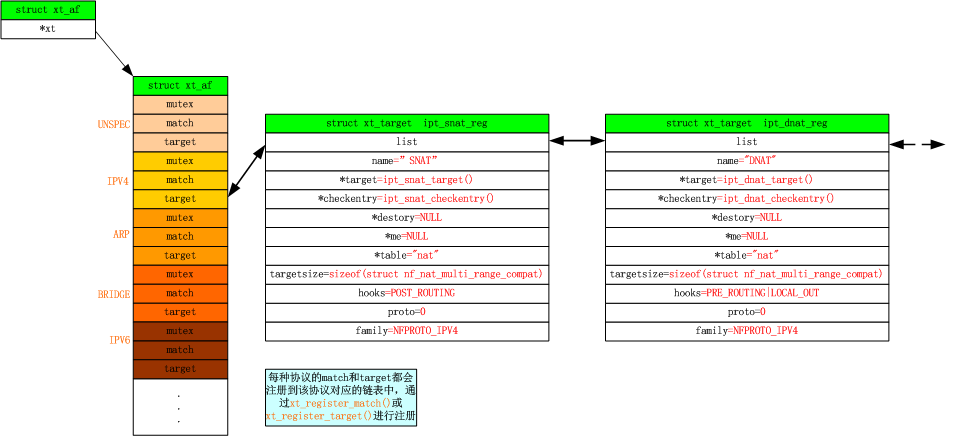
调用nf_register_hooks() 挂载NAT的HOOK函数,橙色部分为NAT挂载的HOOK函数(参考另一个帖子netfilter)
根据上面介绍,可以看到IPv4-NAT的主要是通过nf_nat_fn()钩子函数处理的,下面我就来看看nf_nat_fn()函数的处理流程。
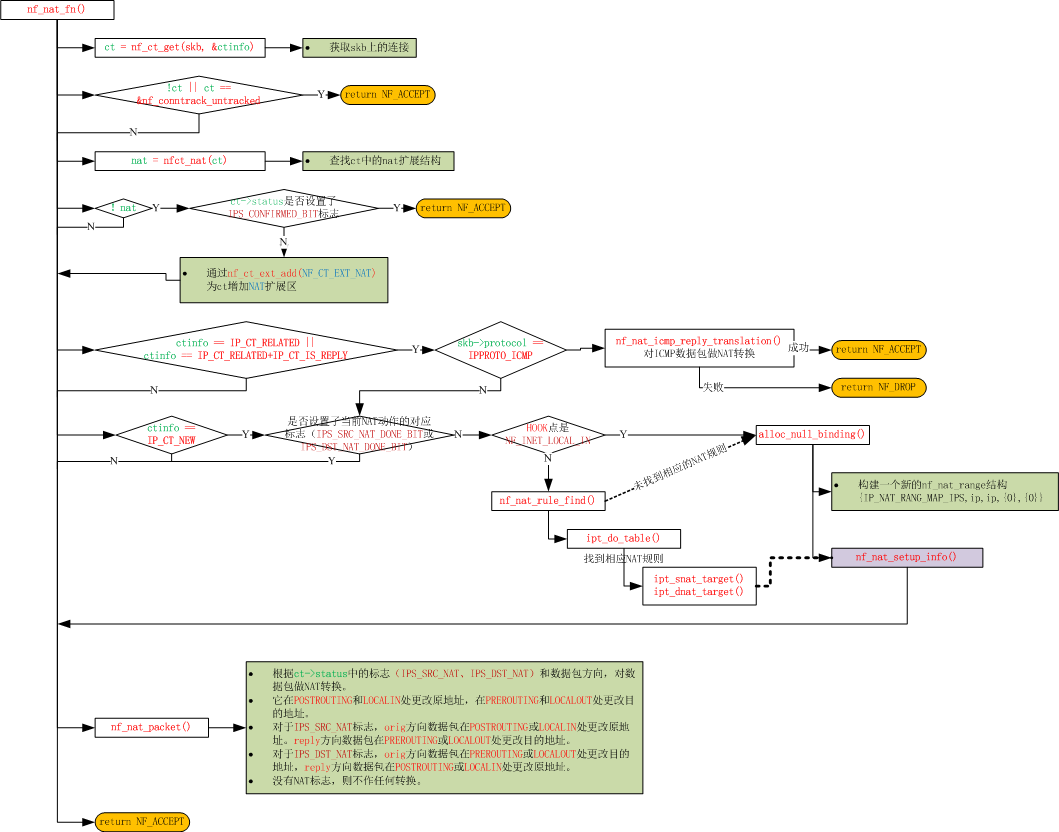
针对上图中的nf_nat_setup_info()函数进一步描述
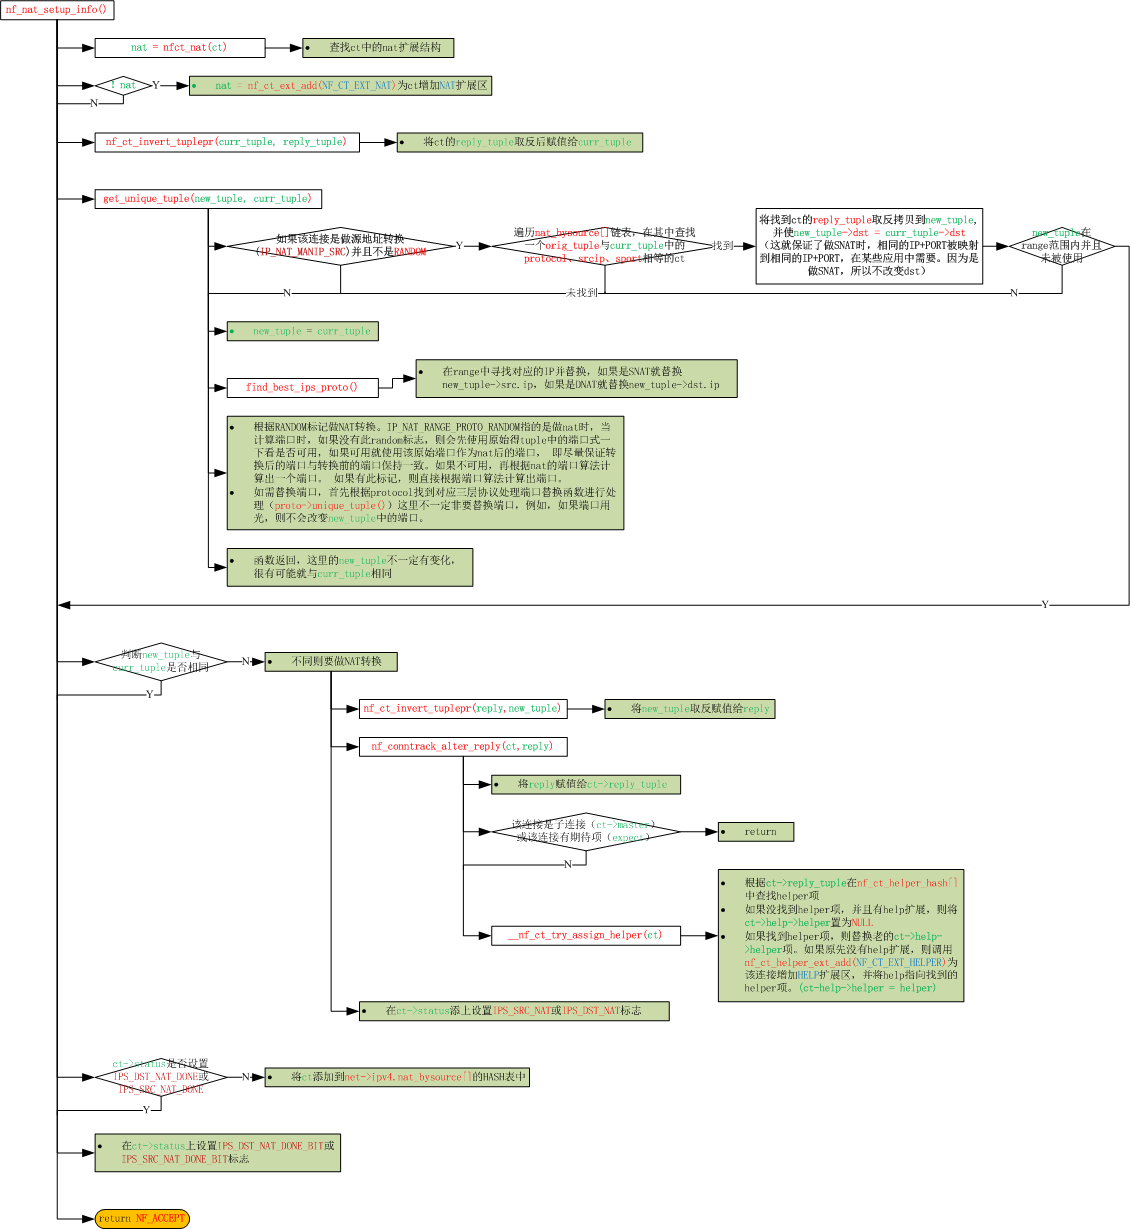
每个ct在第一个包就会做好snat与dnat, nat的信息全放在reply tuple中,orig tuple不会被改变。一旦第一个包建立好nat信息后,后续再也不会修改tuple内容了。
orig tuple中的地址信息与reply tuple中的地址信息就是原始数据包的信息。例如对A->B数据包同时做snat与dnat,PREROUTING处B被dnat到D,POSTROUTING处A被snat到C。则ct的内容是: A->B | D->C, A->B说明了orig方向上数据包刚到达墙时的地址内容,D->C说明reply方向上数据包刚到达墙时的地址内容。
在代码中有很多!dir操作,原理是: 当为了反向的数据包做事情的时候就取反向tuple的数据,这样才能保证NAT后的tuple信息被正确使用。
bysource链中链接了所有CT(做过NAT和未做过NAT),通过ct->nat->bysource,HASH值的计算使用的是CT的orig tuple。其作用是,当为一个新连接做SNAT,需要得到地址映射时,首先对该链进行查找,查找此源IP、协议和端口号是否已经做过了映射。如果做过的话,就需要在SNAT转换时,映射为相同的源IP和端口号。为什么要这么做呢?因为对于UDP来说,有些协议可能会用相同端口和同一主机不同的端口(或不同的主机)进行通信。此时,由于目的地不同,原来已有的映射不可使用,需要一个新的连接。但为了保证通信的的正确性,此时,就要映射为相同的源IP和端口号。其实就是为NAT的打洞服务的。所以bysource就是以源IP、协议和端口号为hash值的一个表,这样在做snat时保证相同的ip+port影射到相同的ip+port。
IP_NAT_RANGE_PROTO_RANDOM指的是做nat时,当计算端口时,如果没有此random标志,则会先使用原始得tuple中的端口试一下看是否可用,如果可用就使用该原始端口作为nat后的端口, 即尽量保证转换后的端口与转换前的端口保持一致。如果不可用,再根据nat的端口算法计算出一个端口。 如果有此标记,则直接根据端口算法计算出端口。
第一个包之后,ct的两个方向的tuple内容就固定了,所有的nat操作都必须在第一个包就完成。所以会有daddr = &ct->tuplehash[!dir].tuple.dst.u3;这样的操作。
IPS_SRC_NAT与IPS_DST_NAT,如果被设置,表示经过了NAT,并且ct中的tuple被做过SNAT或DNAT。
数据包永远都是在PREROUTING链做目的地址和目的端口转换,在POSTROUTING链做原地址和原端口转换。是否要做NAT转换则要根数据包方向(dir)和NAT标志(IPS_SRC_NAT或IPS_DST_NAT)来判断。
在PREROUTING链上—>数据包是original方向、并且连接上设置IPS_DST_NAT标志,或数据包是reply方向、并且连接上设置IPS_SRC_NAT标志,则做DNAT转换。
在POSTROUTING链上—>数据包是original方向、并且连接上设置IPS_SRC_NAT标志,或数据包是reply方向、并且连接上设置IPS_DST_NAT标志,则做SNAT转换。
IPS_DST_NAT_DONE_BIT与IPS_SRC_NAT_DONE_BIT,表示该ct进入过NAT模块,已经进行了源或者目的NAT判断,但并不表示ct中的tuple被修改过。
源目的nat都是在第一个包就判断完成的,假设先添加了snat策略,第一个包通过,这时又添加了dnat策略, 第二个包到来时是不会匹配dnat策略的 。
对于一个ct,nf_nat_setup_info函数最多只能进入2次,第一次DNAT,第二次SNAT。在nf_nat_follow_master函数中,第一次SNAT,第二次DNAT。
下面介绍有子连接的NAT实现。有两个关键点:1.主链接能正确的构建出NAT后的expect来识别子连接。2.能够修改主链接数据通道的信息为NAT后的信息。这两点都在动态协议的help中完成,下面我们来看一下它的流程图:
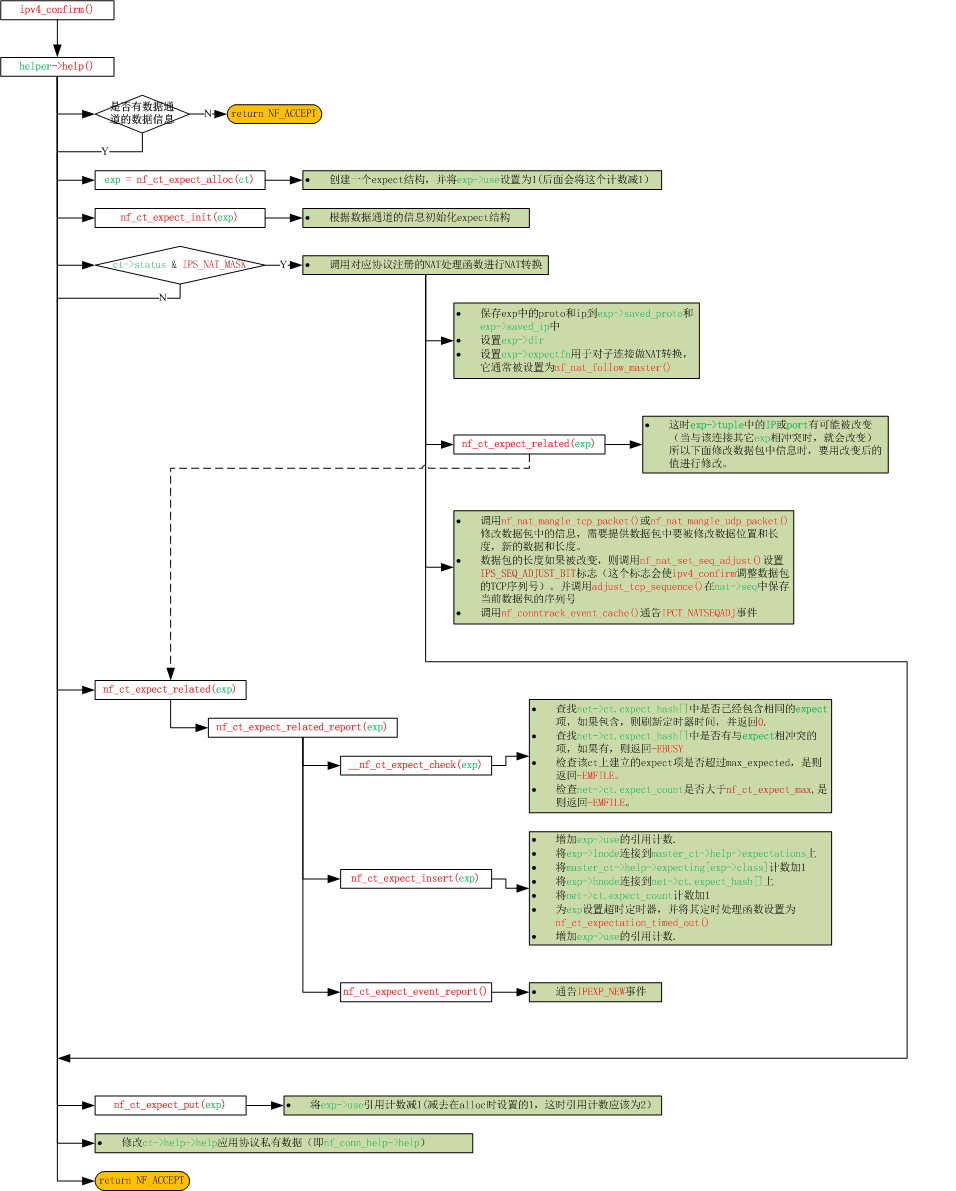
一个ct用于跟踪一个连接的双方向数据,ct->orig_tuple用于跟踪初始方向数据,ct->reply_tuple用于跟踪应答方向数据。当根据初始方向数据构建ct->orig_tuple时,同时要构建出ct->reply_tuple,用于识别同一连接上应答方向数据。
如果初始方向的数据在通过防火墙后被做了NAT转换,为识别出NAT数据的应答数据包,则对ct->reply_tuple也要做NAT转换。同时ct上做好相应NAT标记。
因此,上面的信息在初始方向第一个数据包通过后,就要求全部建立好,并且不再改变。
一个连接上不同方向的数据,都有相对应的tuple(orig_tuple和reply_tuple),所以该连接后续数据都将被识别出来。如果ct上有NAT标记,则根据要去往方向(即另一个方向)的tuple对数据做NAT转换。所以会有ct->tuplehash[!dir].tuple这样的操作。
子连接是由主连接构建的expect项识别出来的。
help用于构建expect项,它期待哪个方向的连接,则用那个方向的tuple和数据包中数据通道信息构建expect项。例如期待和当前数据包相反方向的连接,则用相反方向的tuple中的信息(ct->tuplehash[!dir].tuple)。调用help时,NAT转换都已完成(tuple中都包含有正确的识别各自方向的信息),所以这时所使用的信息都是正确和所期望的信息。
如果子连接还可能有子连接,则构建expect项时,初始化一个helper结构,并赋值给expect->helper指针。
如果该连接已被做了NAT转换,则对数据包中数据通道信息也要做NAT转换