https://tqr.ink/2017/04/16/intel-82599-receive-packet/
本篇文档主要描述了网络数据包在二层的接收流程,主要包括以下三个部分:
1)、82599网卡和数据包接收相关的内容;
2)、ixgbe网卡驱动数据包接收相关的配置;
3)、ixgbe网卡驱动napi接口的处理。
82599网卡和数据包接收相关的内容
这一部分要介绍的是82599网卡中和数据包接收相关的内容。网络报文接收流程所涉及的内容很多,如报文过滤、mac层卸载、报文接收描述符、校验和卸载以及分离报文有效载荷和头部等,由于篇幅原因,这里只介绍了报文接收描述符相关的内容,其他内容会在后续描述中进行穿插。
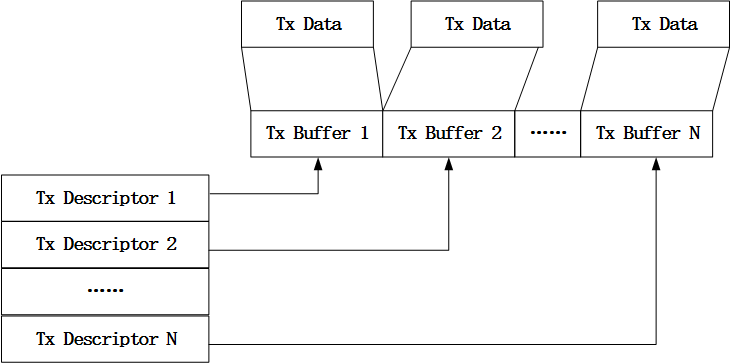
说到网卡报文接收,就必须得说到报文接收描述符,因为报文接收描述符承载了报文从网卡流入到主存的过程。对于网卡硬件而言,当网卡收到网络报文的时候,会往报文接收描述符中指定的地址写入报文数据,而网卡驱动则会从报文接收描述符中指定的地址读取报文,并送往上层协议栈处理。
除了上面说到的存放报文的内存地址,报文接收描述符中还有用于存储报文信息的域。对于82599网卡而言,其支持两种格式的报文接收描述符,即传统格式和高级格式。虽然有两种不同格式的报文接收描述符,但是两种格式的报文接收描述符所占用的内存大小是一样的(目前为16字节),只是对这块内存使用有所不同。对于两种不同格式的报文接收描述符,可以在网卡驱动初始化的时候进行配置,通过设置网卡的SRRCTL寄存器的DRSCTYPE域进而选择使用某种格式的报文接收描述符。在初始化阶段,网卡驱动会申请报文描述符,并填充描述符中相关的域,然后告诉网卡该描述符可用,后续网卡接收到报文就可以用报文描述符来存储报文相关的信息,然后网卡将报文描述符回写给网卡驱动,网卡驱动从中获取所需要信息,并交由上层进行处理。
传统格式报文接收描述符
先来看下82599网卡中对传统格式报文接收描述符的定义,如下:
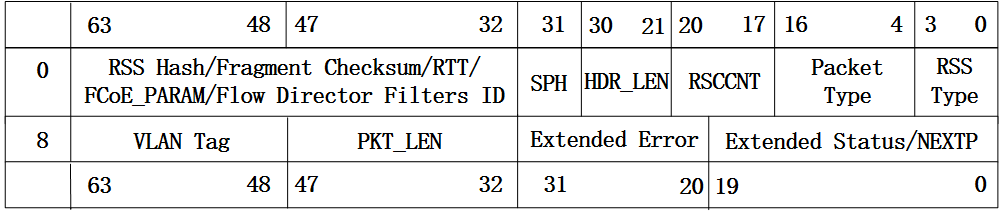
图1 传统格式报文接收描述符
从上面的图中可以看到,报文接收描述符的低八个字节存放的是用于存放报文的内存起始地址,而高八个字节存放的是网卡对报文进行预处理得到的一些信息,如报文长度,VLAN Tag以及校验和信息等,这部分信息会在网卡回写报文描述符给驱动的时候存到描述符对应的域中。对于一些比较固定的功能,比如报文相关校验和计算,VLAN头的解析等功能都可以卸载到网卡,由网卡来操作,这样可以加速报文的处理。
高级格式报文接收描述符
相比于传统格式,高级格式的报文接收描述符可以用来支持更多的功能特性,如分离报文有效负载和报文头等。高级格式的报文描述符由于需要支持更多的功能特性,所以分为了读格式和回写格式。
先来看下82599网卡中读格式的定义,如下图:
图2 高级格式报文接收描述符-读格式
从图中可以看到,读格式的报文描述符中主要有四个部分,分别是报文缓冲区地址、A0位、头缓冲区地址和DD位。对于报文缓冲区地址和头缓冲区地址,顾名思义,存储的就是用来存放报文有效载荷和头部的缓冲区首地址。而对于DD位的作用,网卡驱动可以通过读取该位的值来判断该描述符对应的缓冲区中是否已经存放了网卡接收的报文。 再来看下82599网卡中回写格式的定义,如下图:
图3 高级格式报文接收描述符-回写格式
回写代表的就是网卡往描述符对应的缓冲区中存放了报文数据,并将报文相关的元信息写入到描述符对应的域中,并设置DD位,以告诉网卡驱动该描述已经存放了报文信息。回写格式中涉及到很多和报文相关的信息,如接收报文时所使用的RSS类型,报文长度和报文接收状态等信息。这里不一一介绍,详细可以参考82599的datasheet。
报文接收描述符环形队列
上面说到,报文接收描述符承载了报文从网卡流入到主存的过程,是网卡驱动和网卡都会操作的对象,那么自然而然会有以下几个疑问:
1)、报文接收描述符是以何种组织形式在网卡驱动和网卡之间进行传递的?
2)、网卡驱动怎么通知网卡报文接收描述符可用的?
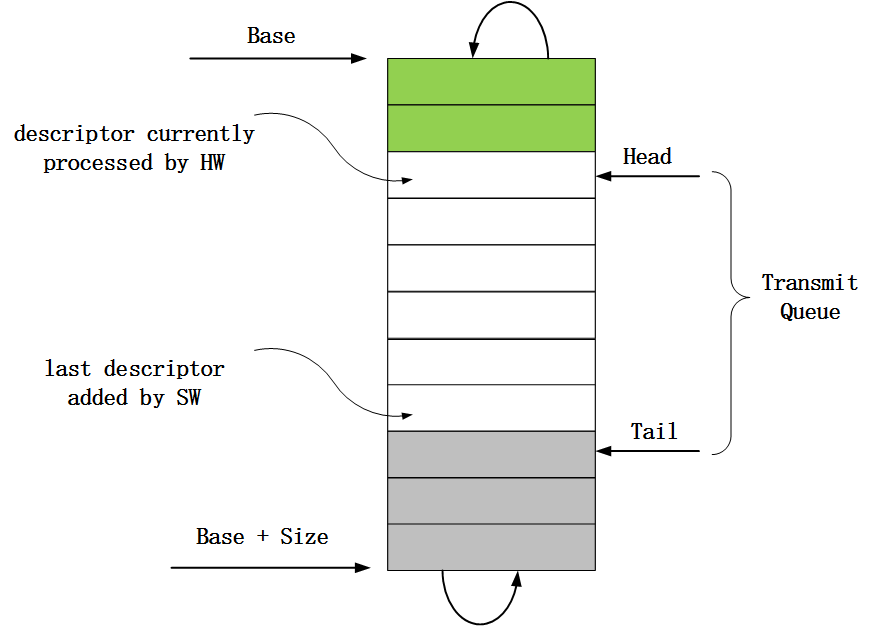
在报文接收流程中,报文接收描述符是通过环形队列来管理的,当然这个环形队列是逻辑上的,队列中的描述符在内存上是连续的。网卡或者网卡驱动在进行操作的时候,如果发现已经到达了队列的末尾,那么下次操作又会从队列头部开始,从而实现环形的操作逻辑。报文接收描述符环形队列的结构体如下:
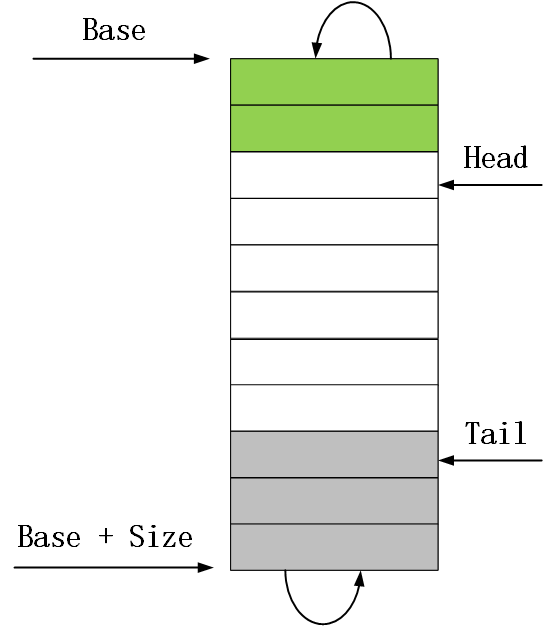
图4 报文接收描述符环形队列结构
对于第一和第二个问题,其中也已经在上面的描述符环形队列图中有体现。在对问题进行回答之前先要了解下82599网卡中和报文接收描述符环形队列相关的几个寄存器。
1)、RDBA寄存器。这个寄存器存放了报文接收描述符环形队列的起始地址,也就是上图中Base指向的地址。
2)、RDLEN寄存器。这个寄存器存放了报文接收描述符环形队列的长度,也就是接收描述符环形队列所占用的字节数,对应上图中的Size。
3)、RDH寄存器。这个寄存器存放的是一个距离队列头部的偏移值,代表的是第一个可以被网卡用来存放报文信息的描述符。当网卡完成了将一个报文信息存放到描述符后,就会更新RDH寄存器的值,使之指向下一个即将用来存放报文信息的描述符。也就是说这个寄存器的值是由网卡来更新的,该寄存器对应上图中的Head。
4)、RDT寄存器。这个寄存器存放的也是一个距离队列头部的偏移值,代表的是硬件可以用来存放报文信息的最后一个描述符的下一个描述符。当网卡驱动填充了报文描述中的报文缓冲区地址后就会更新该寄存器的值,使之指向下一个即将填充地址信息并给网卡使用的描述符,该寄存器对应上图中的Tail。
在了解了这几个寄存器的作用之后,对于本节一开始提出的两个问题就比较容易知晓了。对于第一个问题,报文描述符是以环形队列的方式来组织的;对于第二个问题,因为网卡驱动在提供可用报文接收描述符给网卡后都会更新RDT寄存器的值,所以网卡可以根据RDT寄存器知道自己当前可用的描述符信息,简单来说RDH和RDT之间的描述符就是网卡可以使用的。
ixgbe网卡驱动数据包接收相关的配置
第一部分已经讲了网卡对描述符的定义,以及网卡中用来操作描述符环形队列的几个相关的寄存器,对网卡是如何使用描述符有了一定的了解。这一部分我们一起来看下网卡驱动是如何使用描述符以及管理描述符环形队列的。
报文接收描述符以及描述符环形队列是网卡和网卡驱动都会操作的对象,所以网卡和网卡驱动对接收报文描述符的定义也必须保持一致。与网卡相对应的,网卡驱动从软件的角度定义了接收报文描述符,如下:
1
2
3
4
5
6
7
8
9
10
11
12
13
14
15
16
17
18
19
20
21
22
23
24
25
26
27
28
29
union ixgbe_adv_rx_desc {
struct {
__le64 pkt_addr; /* Packet buffer address */
__le64 hdr_addr; /* Header buffer address */
} read;
struct {
struct {
union {
__le32 data;
struct {
__le16 pkt_info; /* RSS, Pkt type */
__le16 hdr_info; /* Splithdr, hdrlen */
} hs_rss;
} lo_dword;
union {
__le32 rss; /* RSS Hash */
struct {
__le16 ip_id; /* IP id */
__le16 csum; /* Packet Checksum */
} csum_ip;
} hi_dword;
} lower;
struct {
__le32 status_error; /* ext status/error */
__le16 length; /* Packet length */
__le16 vlan; /* VLAN tag */
} upper;
} wb; /* writeback */
};
报文接收描述符环形队列是用做网络报文接收的,而在网卡中接收报文的最小单位是一个队列,即RX队列。所以一般来说就是一个RX队列对应一个报文接收描述符环形队列。
从ixgbe驱动的实现可以知道,ixgbe使用一个叫做中断向量的对象来管理队列,其定义如下:
1
2
3
4
5
6
7
8
9
10
11
12
13
14
15
16
17
18
19
20
21
22
23
24
25
struct ixgbe_q_vector {
struct ixgbe_adapter *adapter;
#ifdef CONFIG_IXGBE_DCA
int cpu; /* CPU for DCA */
#endif
u16 v_idx; /* index of q_vector within array, also used for
* finding the bit in EICR and friends that
* represents the vector for this ring */
u16 itr; /* Interrupt throttle rate written to EITR */
/* 分别以链表方式管理中断向量中的rx和tx队列 */
struct ixgbe_ring_container rx, tx;
struct napi_struct napi;
cpumask_t affinity_mask;
int numa_node;
struct rcu_head rcu; /* to avoid race with update stats on free */
char name[IFNAMSIZ + 9];
#ifdef CONFIG_NET_RX_BUSY_POLL
atomic_t state;
#endif /* CONFIG_NET_RX_BUSY_POLL */
/* for dynamic allocation of rings associated with this q_vector */
struct ixgbe_ring ring[0] ____cacheline_internodealigned_in_smp;
};
在上面的定义中,struct ixgbe_q_vector对象最后一个类型为struct ixgbe_ring的柔性数组成员就是由该中断向量所管理的队列,这里包括了RX队列和TX队列。报文接收流程只需要关注其中的RX队列即可。一般来说一个中断向量会关联一个硬件中断。当网卡往中断向量中的某个RX队列的描述符中写入报文信息时,就会触发对应的硬件中断,然后中断子系统就会调用我们注册的中断处理函数来处理这个中断,在ixgbe驱动中对应的就是ixgbe_intr()(在msi-x中断模式下对应的是ixgbe_msix_clean_rings())。这里需要做一个说明,就是在legacy或者msi中断模式下,只会使用一个中断向量,对应的使用一个中断号;而在msi-x中断模式下,可能会有多个中断向量,对应的会有多个中断号,一般来说会把一个中断向量对应的中断号进行绑核处理,这样可以提高报文处理效率。而具体到某一个RX队列是如何同一个中断号进行关联的,这里还涉及到另外一个网卡寄存器,即Interrupt Vector Alloction(IVAR),这里不再详细介绍,可以参考ixgbe驱动的ixgbe_configure_msi_and_legacy()和ixgbe_configure_msix()函数,以及网卡中断部分的配置。
在ixgbe网卡驱动的实现中,我们可以看到驱动是以一个叫做struct ixgbe_ring的对象来管理报文描述符环形队列(不管是接收还是发送),其定义如下:
1
2
3
4
5
6
7
8
9
10
11
12
13
14
15
16
17
18
19
20
21
22
23
24
25
26
27
28
29
30
31
32
33
34
35
36
37
38
39
40
41
42
43
44
45
46
47
48
49
50
51
52
53
54
55
56
57
58
59
struct ixgbe_ring {
struct ixgbe_ring *next; /* pointer to next ring in q_vector */
struct ixgbe_q_vector *q_vector; /* backpointer to host q_vector */
struct net_device *netdev; /* netdev ring belongs to */
struct device *dev; /* device for DMA mapping */
struct ixgbe_fwd_adapter *l2_accel_priv;
/* 环形队列缓冲区中的报文描述符数组 */
void *desc; /* descriptor ring memory */
/* 与报文描述符数组一一对应的报文缓冲区对象 */
union {
struct ixgbe_tx_buffer *tx_buffer_info;
struct ixgbe_rx_buffer *rx_buffer_info;
};
unsigned long state;
u8 __iomem *tail; /* 指向RDT寄存器对应的内核虚拟地址 */
/* 报文描述符数组对应的物理地址 */
dma_addr_t dma; /* phys. address of descriptor ring */
unsigned int size; /* length in bytes */
/* 环形队列缓冲区中的报文描述符个数 */
u16 count; /* amount of descriptors */
/*
* 环形队列缓冲区关联的rx队列索引,这个索引是用来在adapter->rx数组索引环形队列缓冲区的
*/
u8 queue_index; /* needed for multiqueue queue management */
u8 reg_idx; /* holds the special value that gets
* the hardware register offset
* associated with this ring, which is
* different for DCB and RSS modes
*/
/*
* next_to_use是环形队列缓冲区中将要提供给硬件使用的第一个报文描述符的索引,对应的就是RDT寄存器
* next_to_clean是环形队列缓冲区中驱动将要处理的第一个报文描述符的索引
*/
u16 next_to_use;
u16 next_to_clean;
unsigned long last_rx_timestamp;
union {
u16 next_to_alloc;
struct {
u8 atr_sample_rate;
u8 atr_count;
};
};
u8 dcb_tc;
struct ixgbe_queue_stats stats;
struct u64_stats_sync syncp;
union {
struct ixgbe_tx_queue_stats tx_stats;
struct ixgbe_rx_queue_stats rx_stats;
};
} ____cacheline_internodealigned_in_smp;
struct ixgbe_ring对象中最重要的几个成员都已经做了注解,其中的desc成员就是报文描述符队列,从这里的实现也可以看出,报文描述符队列实际上是线性的,其逻辑上的环形操作是通过struct ixgbe_ring对象中的成员,如next_to_clean、next_to_alloc和next_to_use等来实现的。另外,struct ixgbe_ring对象中还有一个类型为dma_addr_t的dma成员,该成员就是desc成员对应的物理地址,有desc成员的内核虚拟地址进行一致性dma映射得到。这样ixgbe驱动可以通过desc来操作描述符环形队列,而网卡可以通过dma成员来操作描述符环形队列。
下面一起来看下ixgbe驱动是如何建立一个描述符环形队列管理对象的。其实现如下:
1
2
3
4
5
6
7
8
9
10
11
12
13
14
15
16
17
18
19
20
21
22
23
24
25
26
27
28
29
30
31
32
33
34
35
36
37
38
39
40
41
42
43
44
45
46
int ixgbe_setup_rx_resources(struct ixgbe_ring *rx_ring)
{
struct device *dev = rx_ring->dev;
int orig_node = dev_to_node(dev);
int ring_node = -1;
int size;
size = sizeof(struct ixgbe_rx_buffer) * rx_ring->count;
if (rx_ring->q_vector)
ring_node = rx_ring->q_vector->numa_node;
rx_ring->rx_buffer_info = vzalloc_node(size, ring_node);
if (!rx_ring->rx_buffer_info)
rx_ring->rx_buffer_info = vzalloc(size);
if (!rx_ring->rx_buffer_info)
goto err;
u64_stats_init(&rx_ring->syncp);
/* Round up to nearest 4K */
rx_ring->size = rx_ring->count * sizeof(union ixgbe_adv_rx_desc);
rx_ring->size = ALIGN(rx_ring->size, 4096);
set_dev_node(dev, ring_node);
rx_ring->desc = dma_alloc_coherent(dev,
rx_ring->size,
&rx_ring->dma,
GFP_KERNEL);
set_dev_node(dev, orig_node);
if (!rx_ring->desc)
rx_ring->desc = dma_alloc_coherent(dev, rx_ring->size,
&rx_ring->dma, GFP_KERNEL);
if (!rx_ring->desc)
goto err;
rx_ring->next_to_clean = 0;
rx_ring->next_to_use = 0;
return 0;
err:
vfree(rx_ring->rx_buffer_info);
rx_ring->rx_buffer_info = NULL;
dev_err(dev, "Unable to allocate memory for the Rx descriptor ring\n");
return -ENOMEM;
}
函数ixgbe_setup_rx_resources()处理流程很清晰:
1)、根据之前配置好的环形队列中报文接收描述符个数申请报文描述符数组所需要的内存,以及对应的用来管理报文缓冲区地址信息的缓冲区对象,这个时候缓冲区对象中用来存放报文内容的地址仍然是无效的,因为还没有申请内存,在函数ixgbe_alloc_rx_buffers()处理完成之后,缓冲区对象中存放报文内容的地址就是有效的,可以提供给网卡用来存放报文数据。此外,对报文接收描述符数组内存进行一致性dma映射,获取对应的物理地址,网卡需要使用物理地址,而不是虚拟地址。
2)、初始化描述符环形队列操作所涉及到的索引成员,包括next_to_use和next_to_clean。
经过ixgbe_setup_rx_resources()函数的处理,就已经成功创建了一个描述符环形的管理对象。接下来就需要告诉网卡这个描述符环形队列的信息,这个就是函数ixgbe_configure_rx_ring()所要做的事情了,其实现如下:
1
2
3
4
5
6
7
8
9
10
11
12
13
14
15
16
17
18
19
20
21
22
23
24
25
26
27
28
29
30
31
32
33
34
35
36
37
38
39
40
41
42
43
44
45
46
47
48
49
50
51
52
53
54
55
56
57
58
59
60
61
void ixgbe_configure_rx_ring(struct ixgbe_adapter *adapter,
struct ixgbe_ring *ring)
{
struct ixgbe_hw *hw = &adapter->hw;
/* 环形队列缓冲区中报文描述符数组对应的物理地址 */
u64 rdba = ring->dma;
u32 rxdctl;
u8 reg_idx = ring->reg_idx;
/* disable queue to avoid issues while updating state */
rxdctl = IXGBE_READ_REG(hw, IXGBE_RXDCTL(reg_idx));
ixgbe_disable_rx_queue(adapter, ring);
/*
* 将报文描述符数组的首地址写入到RDBAH和RDBAL寄存器中,并将描述符数组的长度
* 写入到RDLEN寄存器中,这样网卡芯片就知道了报文描述符的信息,后续可以收到
* 合适的网络报文后,就会将报文存放到描述符里面的dma地址中,并递增内部的
* head寄存器值
*/
IXGBE_WRITE_REG(hw, IXGBE_RDBAL(reg_idx), (rdba & DMA_BIT_MASK(32)));
IXGBE_WRITE_REG(hw, IXGBE_RDBAH(reg_idx), (rdba >> 32));
IXGBE_WRITE_REG(hw, IXGBE_RDLEN(reg_idx),
ring->count * sizeof(union ixgbe_adv_rx_desc));
/* Force flushing of IXGBE_RDLEN to prevent MDD */
IXGBE_WRITE_FLUSH(hw);
/*
* 初始状态下,网卡芯片的head和tail指针都为0,表示网卡没有可用的报文描述符
* 等后面驱动申请了n个报文描述符中的dma地址后,就会将tail寄存器值设置为n,
* 表示目前网卡可用的报文描述符数量为n个。这样,等网卡收到了合适的报文之后
* 就会存到报文描述符中的dma地址处。
*/
IXGBE_WRITE_REG(hw, IXGBE_RDH(reg_idx), 0);
IXGBE_WRITE_REG(hw, IXGBE_RDT(reg_idx), 0);
ring->tail = adapter->io_addr + IXGBE_RDT(reg_idx);
ixgbe_configure_srrctl(adapter, ring);
ixgbe_configure_rscctl(adapter, ring);
if (hw->mac.type == ixgbe_mac_82598EB) {
/*
* enable cache line friendly hardware writes:
* PTHRESH=32 descriptors (half the internal cache),
* this also removes ugly rx_no_buffer_count increment
* HTHRESH=4 descriptors (to minimize latency on fetch)
* WTHRESH=8 burst writeback up to two cache lines
*/
rxdctl &= ~0x3FFFFF;
rxdctl |= 0x080420;
}
/* enable receive descriptor ring */
rxdctl |= IXGBE_RXDCTL_ENABLE;
IXGBE_WRITE_REG(hw, IXGBE_RXDCTL(reg_idx), rxdctl);
ixgbe_rx_desc_queue_enable(adapter, ring);
/* 申请报文描述符中用于存储报文数据的内存 */
ixgbe_alloc_rx_buffers(ring, ixgbe_desc_unused(ring));
}
从该函数的实现就可以看到,网卡驱动就是通过将接收报文描述符数组对应的物理地址写入到RDBA寄存器,并初始化RDH和RDT寄存器。通过写RDBA、RDH和RDT寄存器,网卡就知道了当前的描述符环形队列的信息。接着调用函数ixgbe_alloc_rx_buffers()申请用来存放报文数据的内存,并将对应的物理地址保存到接收描述符中,然后设置RDT寄存器,这样网卡就可以使用RDH和RDT之间的描述符进行接收报文处理了,ixgbe_alloc_rx_buffers()函数的实现如下:
1
2
3
4
5
6
7
8
9
10
11
12
13
14
15
16
17
18
19
20
21
22
23
24
25
26
27
28
29
30
31
32
33
34
35
36
37
38
39
40
41
42
43
44
45
46
47
48
49
50
51
52
53
54
55
56
57
58
59
60
61
62
63
64
65
66
67
68
69
70
71
72
73
74
75
76
77
78
79
80
81
82
83
84
85
86
87
88
89
90
91
92
93
94
95
96
97
98
99
100
101
102
103
void ixgbe_alloc_rx_buffers(struct ixgbe_ring *rx_ring, u16 cleaned_count)
{
union ixgbe_adv_rx_desc *rx_desc;
struct ixgbe_rx_buffer *bi;
u16 i = rx_ring->next_to_use;
/* nothing to do */
if (!cleaned_count)
return;
/*
* 获取下一个将要提供给硬件使用的报文描述符(对应的索引为rx_ring->next_to_use),
* 以及报文描述符对应的缓冲区对象,缓冲区对象中保存了用于存放报文数据的内存地址信息,
* 当然用于存放报文的内存对应的物理地址也会保存到报文描述符中。
*/
rx_desc = IXGBE_RX_DESC(rx_ring, i);
bi = &rx_ring->rx_buffer_info[i];
/*
* 这个地方执行这个计算的目的是什么呢?我们知道报文描述符队列在逻辑上是环形的(
* 实际上是线性的,因为内存地址是线性分布的),当我们操作这个队列到达末尾的时候,
* 通过将索引重新指向队列开头来实现环形操作。所以呢,在计算之后,i表示的就是
* 目前位置距离队列末尾之间还没有提供给硬件使用的报文描述符个数的相反数,也就是
* 当前处理位置和队列末尾距离。
* 在下面的循环中,每处理一个报文描述符(申请用于存放报文数据的内存)都会将i递增,
* 当i等于0的时候,说明达到了队列的末尾,下次处理就要从队列头开始了,从而实现
* 队列的环形操作。
*/
i -= rx_ring->count;
do {
/*
* 申请用于存放报文数据的内存,并进行dma流式映射
*/
if (!ixgbe_alloc_mapped_page(rx_ring, bi))
break;
/*
* Refresh the desc even if buffer_addrs didn't change
* because each write-back erases this info.
*/
/* rx_desc->read.pkt_addr存放的地址就是用于存放报文的dma起始地址 */
rx_desc->read.pkt_addr = cpu_to_le64(bi->dma + bi->page_offset);
/* rx_desc和bi递增,指向下一个描述符和对应的缓冲区对象 */
rx_desc++;
bi++;
i++;
/*
* 如果i == 0,说明操作环形队列缓冲区已经转了一圈了,这个时候就需要重新让
* rx_desc和bi分别指向描述符数组和缓冲区数组的起始位置,从头开始处理,当然
* 对应的i值也就要重新计算了,此时的值为队列中描述符个数的相反数。
*/
if (unlikely(!i)) {
/*
* 考虑下为什么描述符环形队列中已经被网卡使用过的描述符中存放报文内容的
* 内存需要重新申请并进行流式dma映射呢?我们知道,一个描述符中用来存放
* 报文的内存(实际上是一个页),接收完报文后如果空间足够,有可能被其他描述符
* 重用,或者报文较大而产生分片,这个时候并不会从描述符中存放报文的内存中
* 将报文数据拷贝到skb->data中,而是将描述符中存放报文的页内存挂载到
* skb_shinfo(skb)->frags数组中,无论前面的哪种情况,本描述符中用于
* 存放报文数据的内存在本描述符用于接收报文之后都不能再被该描述符继续使用了,
* 所需每次都需要重新申请内存,或者重用之前的报文描述符的页内存。这也是为什么
* 在函数ixgbe_fetch_rx_buffer()末尾会将rx_buffer->page置空的原因。
*/
rx_desc = IXGBE_RX_DESC(rx_ring, 0);
bi = rx_ring->rx_buffer_info;
i -= rx_ring->count;
}
/* clear the status bits for the next_to_use descriptor */
rx_desc->wb.upper.status_error = 0;
cleaned_count--;
} while (cleaned_count);
/*
* i加上rx_ring->count之后指向的就是最后一个可用(对网卡芯片来说)的报文描述符的
* 下一个位置,,这个时候需要将这个索引值i写入到网卡芯片的tail寄存器中,让网卡
* 芯片知道目前可用的报文描述数量(tail - head)
*/
i += rx_ring->count;
if (rx_ring->next_to_use != i) {
/*
* 因为i指向的是最后一个可用报文描述符的下一个位置,这个位置也是下一次要
* 提供给网卡芯片使用的报文描述符的位置
*/
rx_ring->next_to_use = i;
/* update next to alloc since we have filled the ring */
rx_ring->next_to_alloc = i;
/* Force memory writes to complete before letting h/w
* know there are new descriptors to fetch. (Only
* applicable for weak-ordered memory model archs,
* such as IA-64).
*/
wmb();
/* 将i值写入到tail寄存器中 */
writel(i, rx_ring->tail);
}
}
补充说明:RDT寄存器由网卡驱动在提供报文接收描述符给网卡之后更新,而RDH寄存器由网卡在回写一个报文接收描述符给驱动之后更新。
ixgbe网卡驱动napi接口的处理
NAPI是Linux中综合了中断和轮询方式的网卡数据处理API。下面描述下ixgbe中是如何使用NAPI方式来进行收包处理的。
NAPI对象
在Linux中,NAPI接口提供了一个NAPI对象,这个是设备使用NAPI接口进行数据包处理的必要条件,先来看下其定义:
1
2
3
4
5
6
7
8
9
10
11
12
13
14
15
16
17
18
19
20
21
22
23
24
25
struct napi_struct {
/* The poll_list must only be managed by the entity which
* changes the state of the NAPI_STATE_SCHED bit. This means
* whoever atomically sets that bit can add this napi_struct
* to the per-CPU poll_list, and whoever clears that bit
* can remove from the list right before clearing the bit.
*/
struct list_head poll_list;
unsigned long state;
int weight;
unsigned int gro_count;
int (*poll)(struct napi_struct *, int);
#ifdef CONFIG_NETPOLL
spinlock_t poll_lock;
int poll_owner;
#endif
struct net_device *dev;
struct sk_buff *gro_list;
struct sk_buff *skb;
struct hrtimer timer;
struct list_head dev_list;
struct hlist_node napi_hash_node;
unsigned int napi_id;
};
一般来说,如果某个设备要使用NAPI接口进行数据包处理,那么该设备会在自己的设备对象中定义一个struct napi_struct类型的对象成员。在第二部分讲到过,ixgbe驱动中每个中断向量会关联一个中断号,从而在硬中断处理函数能获取到中断向量,而如果利用NAPI进行数据包处理的话,也就必须要获取到对应的struct napi_struct类型的对象,所以自然而然地ixgbe驱动将struct napi_struct类型的对象定义在了中断向量中。
下面对其中的部分重要成员进行简单的介绍:
1)、 poll_list。用于将本设备加入到cpu私有数据中类型为struct softnet_data的对象的待轮询设备链表中。
2)、state。设备的状态,有如下几种:
1
2
3
4
5
6
7
enum {
NAPI_STATE_SCHED, /* Poll is scheduled */
NAPI_STATE_DISABLE, /* Disable pending */
NAPI_STATE_NPSVC, /* Netpoll - don't dequeue from poll_list */
NAPI_STATE_HASHED, /* In NAPI hash (busy polling possible) */
NAPI_STATE_NO_BUSY_POLL,/* Do not add in napi_hash, no busy polling */
};
3)、weight。设备每次轮询所能处理的包的最大数量。
4)、poll。设备注册的轮询回调,在该回调中一般会遍历设备的所有rx队列,取出报文,送往上层处理。
NAPI初始化
从驱动实现我们知道,ixgbe驱动在中断向量中定义了一个类型为struct napi_struct的NAPI实例。在ixgbe驱动初始化的时候,会在创建中断向量的时候初始化其对应NAPI实例,实现如下:
1
2
3
4
5
6
7
8
9
10
11
12
13
14
15
16
17
18
19
20
21
22
23
24
25
26
27
28
29
30
31
32
33
34
static int ixgbe_alloc_q_vector(struct ixgbe_adapter *adapter,
int v_count, int v_idx,
int txr_count, int txr_idx,
int rxr_count, int rxr_idx)
{
struct ixgbe_q_vector *q_vector;
struct ixgbe_ring *ring;
int node = NUMA_NO_NODE;
int cpu = -1;
int ring_count, size;
u8 tcs = netdev_get_num_tc(adapter->netdev);
/* 计算这个中断向量所需要申请的环形队列缓冲区的总数量 */
ring_count = txr_count + rxr_count;
/* 申请中断向量内存以及环形队列缓冲区对应的柔性数组内存。 */
size = sizeof(struct ixgbe_q_vector) +
(sizeof(struct ixgbe_ring) * ring_count);
……
/* allocate q_vector and rings */
/* numa架构下,在cpu所在的本地内存申请中断向量所需内存 */
q_vector = kzalloc_node(size, GFP_KERNEL, node);
if (!q_vector)
q_vector = kzalloc(size, GFP_KERNEL);
if (!q_vector)
return -ENOMEM;
/* initialize NAPI */
/* 初始化napi收包方式 */
netif_napi_add(adapter->netdev, &q_vector->napi,
ixgbe_poll, 64);
……
return 0;
}
从函数ixgbe_alloc_q_vector()调用netif_napi_add()初始化NAPI对象可以看到,ixgbe驱动注册的poll回调钩子是ixgbe_poll(),而每次轮询最大可处理的数据包为64个。
NAPI调度
在ixgbe驱动中因为使用了NAPI接口进行数据包处理,所以对应的上半部实现就变成了当硬中断触发后,在硬中断处理函数中调用NAPI的调度接口napi_schedule_irqoff()将设备加入到cpu私有数据中类型为struct softnet_data的对象的待轮询设备链表中,并触发软中断。以msi-x中断模式为例,其对应的具体实现如下:
1
2
3
4
5
6
7
8
9
10
11
static irqreturn_t ixgbe_msix_clean_rings(int irq, void *data)
{
struct ixgbe_q_vector *q_vector = data;
/* EIAM disabled interrupts (on this vector) for us */
if (q_vector->rx.ring || q_vector->tx.ring)
napi_schedule_irqoff(&q_vector->napi);
return IRQ_HANDLED;
}
而下半部的处理就是在网络子系统的软中断处理函数net_rx_action()中遍历cpu私有数据中类型为struct softnet_data的对象中的待轮询设备链表,依次调用每个设备注册的poll回调钩子进行报文接收处理,其对应的具体实现如下:
1
2
3
4
5
6
7
8
9
10
11
12
13
14
15
16
17
18
19
20
21
22
23
24
25
26
27
28
29
30
31
32
33
34
35
36
37
38
39
40
41
42
43
44
45
46
static __latent_entropy void net_rx_action(struct softirq_action *h)
{
	struct softnet_data *sd = this_cpu_ptr(&softnet_data);
	unsigned long time_limit = jiffies + 2;
	int budget = netdev_budget;
	LIST_HEAD(list);
	LIST_HEAD(repoll);

	local_irq_disable();
	list_splice_init(&sd->poll_list, &list);
	local_irq_enable();

	for (;;) {
		struct napi_struct *n;

		if (list_empty(&list)) {
			if (!sd_has_rps_ipi_waiting(sd) && list_empty(&repoll))
				return;
			break;
		}

		n = list_first_entry(&list, struct napi_struct, poll_list);
		budget -= napi_poll(n, &repoll);

		/* If softirq window is exhausted then punt.
		 * Allow this to run for 2 jiffies since which will allow
		 * an average latency of 1.5/HZ.
		 */
		if (unlikely(budget <= 0 ||
			     time_after_eq(jiffies, time_limit))) {
			sd->time_squeeze++;
			break;
		}
	}

	__kfree_skb_flush();
	local_irq_disable();

	list_splice_tail_init(&sd->poll_list, &list);
	list_splice_tail(&repoll, &list);
	list_splice(&list, &sd->poll_list);
	if (!list_empty(&sd->poll_list))
		__raise_softirq_irqoff(NET_RX_SOFTIRQ);

	net_rps_action_and_irq_enable(sd);
}
上面说到过,在下半部的软中断处理函数中会调用设备注册的回调函数poll进行收包处理,而ixgbe驱动中对应的轮询回调函数就是ixgbe_poll()。在这个函数中会遍历NAPI对象关联的中断向量中的所有RX队列,将收到的每一个报文通过调用函数__netif_receive_skb()送往上层协议栈进行处理,具体处理细节可以参考驱动实现。
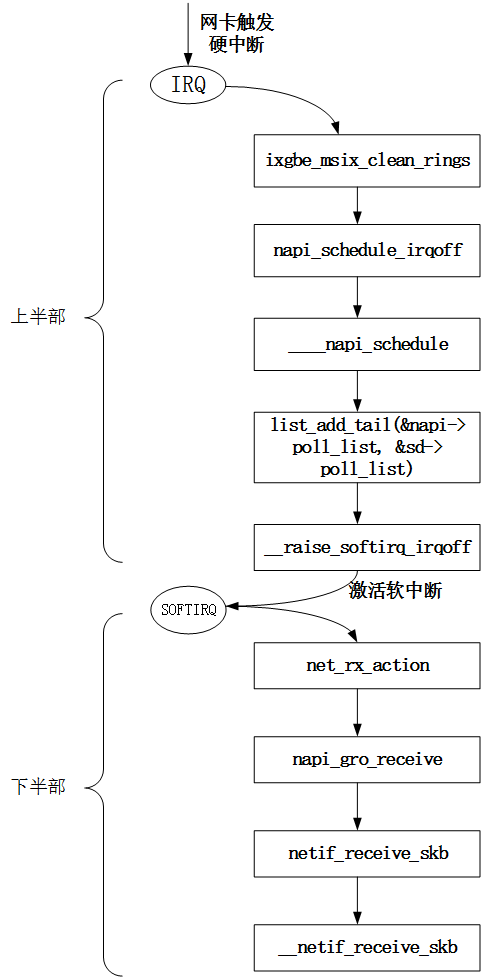
通过上面对ixgbe驱动中使用NAPI接口的描述,我们可以总结出NAPI接口的数据包接收流程如下:
图5 NAPI调度流程
注:上面的流程图中NAPI假设上层会关闭和打开的硬中断