  LRO
  ---
  Large Receive Offload (LRO) is a technique for increasing inbound throughput
  of high-bandwidth network connections by reducing CPU overhead. It works by
  aggregating multiple incoming packets from a single stream into a larger
  buffer before they are passed higher up the networking stack, thus reducing
  the number of packets that have to be processed. LRO combines multiple
  Ethernet frames into a single receive in the stack, thereby potentially
  decreasing CPU utilization for receives.

  IXGBE_NO_LRO is a compile time flag. The user can enable it at compile
  time to remove support for LRO from the driver. The flag is used by adding
  CFLAGS_EXTRA="-DIXGBE_NO_LRO" to the make file when it's being compiled.

	 make CFLAGS_EXTRA="-DIXGBE_NO_LRO" install

  You can verify that the driver is using LRO by looking at these counters in
  ethtool:

  lro_flushed - the total number of receives using LRO.
  lro_aggregated - counts the total number of Ethernet packets that were combined.

  NOTE: IPv6 and UDP are not supported by LRO.

  HW RSC
  ------
  82599 and X540-based adapters support HW based receive side coalescing (RSC)
  which can merge multiple frames from the same IPv4 TCP/IP flow into a single
  structure that can span one or more descriptors. It works similarly to SW
  Large receive offload technique. By default HW RSC is enabled and SW LRO
  cannot be used for 82599 or X540-based adapters unless HW RSC is disabled.

  IXGBE_NO_HW_RSC is a compile time flag. The user can enable it at compile
  time to remove support for HW RSC from the driver. The flag is used by adding
  CFLAGS_EXTRA="-DIXGBE_NO_HW_RSC" to the make file when it's being compiled.

	 make CFLAGS_EXTRA="-DIXGBE_NO_HW_RSC" install

  You can verify that the driver is using HW RSC by looking at the counter in
  ethtool:

	 hw_rsc_count - counts the total number of Ethernet packets that were being
	 combined.

	...

max_vfs
-------
Valid Range:   1-63
Default Value: 0

  If the value is greater than 0 it will also force the VMDq parameter to be 1
  or more.

  This parameter adds support for SR-IOV.  It causes the driver to spawn up to
  max_vfs worth of virtual function.

  NOTE: When either SR-IOV mode or VMDq mode is enabled, hardware VLAN
  filtering and VLAN tag stripping/insertion will remain enabled.
  Please remove the old VLAN filter before the new VLAN filter is added.
  For example,

	ip link set eth0 vf 0 vlan 100     // set vlan 100 for VF 0
	ip link set eth0 vf 0 vlan 0       // Delete vlan 100
	ip link set eth0 vf 0 vlan 200     // set a new vlan 200 for VF 0

The parameters for the driver are referenced by position.  So, if you have a
dual port 82599 or X540-based adapter and you want N virtual functions per
port, you must specify a number for each port with each parameter separated by
a comma.

For example:
  modprobe ixgbe max_vfs=63,63

NOTE: If both 82598 and 82599 or X540-based adapters are installed on the same
machine, you must be careful in loading the driver with the parameters.
Depending on system configuration, number of slots, etc. it's impossible to
predict in all cases where the positions would be on the command line and the
user will have to specify zero in those positions occupied by an 82598 port.

With kernel 3.6, the driver supports the simultaneous usage of max_vfs and DCB
features, subject to the constraints described below. Prior to kernel 3.6, the
driver did not support the simultaneous operation of max_vfs > 0 and the DCB
features (multiple traffic classes utilizing Priority Flow Control and Extended
Transmission Selection).

When DCB is enabled, network traffic is transmitted and received through multiple
traffic classes (packet buffers in the NIC). The traffic is associated with a
specific class based on priority, which has a value of 0 through 7 used in the
VLAN tag. When SR-IOV is not enabled, each traffic class is associated with a set
of RX/TX descriptor queue pairs. The number of queue pairs for a given traffic
class depends on the hardware configuration. When SR-IOV is enabled, the descriptor
queue pairs are grouped into pools. The Physical Function (PF) and each Virtual
Function (VF) is allocated a pool of RX/TX descriptor queue pairs. When multiple
traffic classes are configured (for example, DCB is enabled), each pool contains a
queue pair from each traffic class. When a single traffic class is configured in
the hardware, the pools contain multiple queue pairs from the single traffic class.

The number of VFs that can be allocated depends on the number of traffic classes
that can be enabled. The configurable number of traffic classes for each enabled
VF is as follows:

  0 - 15 VFs = Up to 8 traffic classes, depending on device support

  16 - 31 VFs = Up to 4 traffic classes

  32 - 63 = 1 traffic class

When VFs are configured, the PF is allocated one pool as well. The PF supports
the DCB features with the constraint that each traffic class will only use a
single queue pair. When zero VFs are configured, the PF can support multiple
queue pairs per traffic class.
  Chris Wright has this board in hands, here the comment from him:
  > OK, disabling hw RSC with 'ethtool -C eth2 rx-usecs 0' (thanks
  > Herbert!) is bringing this back for me (something like ~1800 Mb/s).
  > This is roughly what booting with max_vfs=1 should have done, so I'm not
  > sure why that didn't work.

  Note that disabling coalescing with ethtool results in better,
  though still poor performance as would be expected since we're disabling coalescing.
  The "max_vfs=1" parameter disables RSC as a side-effect and
  doesn't have the performance hit that disabling interrupt coalescing on the NIC does.
  In internal testing, "max_vfs=1" results in ~2.5x better performance than using ethtool.
struct cpufreq_governor {
	char    name[CPUFREQ_NAME_LEN];
	int     initialized;
	int     (*governor)     (struct cpufreq_policy *policy,
				 unsigned int event);
	ssize_t (*show_setspeed)        (struct cpufreq_policy *policy,
					 char *buf);
	int     (*store_setspeed)       (struct cpufreq_policy *policy,
					 unsigned int freq);
	unsigned int max_transition_latency; /* HW must be able to switch to
			next freq faster than this value in nano secs or we
			will fallback to performance governor */
	struct list_head        governor_list;
	struct module           *owner;
};
struct cpufreq_driver {
	struct module           *owner;
	char                    name[CPUFREQ_NAME_LEN];
	u8                      flags;

	bool                    have_governor_per_policy;

	/* needed by all drivers */
	int     (*init)         (struct cpufreq_policy *policy);
	int     (*verify)       (struct cpufreq_policy *policy);

	/* define one out of two */
	int     (*setpolicy)    (struct cpufreq_policy *policy);
	int     (*target)       (struct cpufreq_policy *policy,
				 unsigned int target_freq,
				 unsigned int relation);

	/* should be defined, if possible */
	unsigned int    (*get)  (unsigned int cpu);

	/* optional */
	unsigned int (*getavg)  (struct cpufreq_policy *policy,
				 unsigned int cpu);
	int     (*bios_limit)   (int cpu, unsigned int *limit);

	int     (*exit)         (struct cpufreq_policy *policy);
	int     (*suspend)      (struct cpufreq_policy *policy);
	int     (*resume)       (struct cpufreq_policy *policy);
	struct freq_attr        **attr;
};
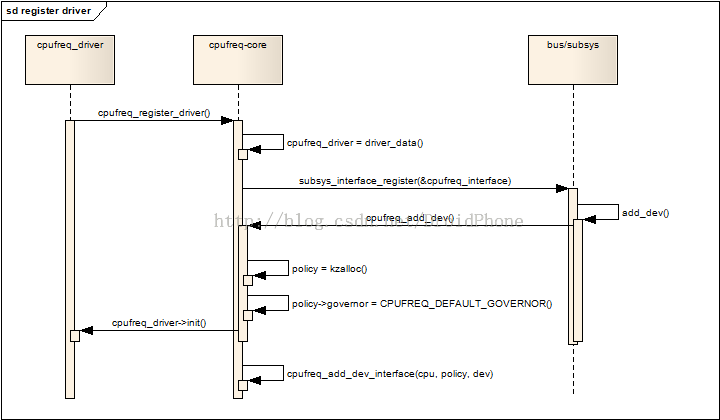
ret = subsys_interface_register(&cpufreq_interface);

......
......

register_hotcpu_notifier(&cpufreq_cpu_notifier);
通过subsys_interface_register给每一个cpu建立一个cpufreq_policy,最后注册cpu hot plug通知,以便在cpu hot plug的时候,能够动态地处理各个cpu policy之间的关系(比如迁移负责管理的cpu等等)。这里要重点讨论一下subsys_interface_register的过程,回到第一节的内容,我们知道初始化阶段,cpu_subsys被建立,从而每个cpu都会在cpu总线设备下建立一个属于自己的设备:sys/devices/system/cpu/cpux。subsys_interface_register负责在cpu_subsys子系统的子设备下面注册公共的接口。我们看看参数cpufreq_interface的定义:
policy = cpufreq_cpu_get(cpu);
if (unlikely(policy)) {
	cpufreq_cpu_put(policy);
	return 0;
}
因为cpu hot plug期间,cpufreq_add_dev也会被调用,下面的代码片段检测该cpu之前是否被hot-unpluged过,如果是,找到其中一个相关的cpu(这些相关的cpu都委托给同一个托管它cpu进行管理,调用cpufreq_add_policy_cpu函数,该函数只是简单地建立一个cpufreq链接,链接到管理cpu的cpufreq节点。
static int cpufreq_add_dev_interface(unsigned int cpu,
				     struct cpufreq_policy *policy,
				     struct device *dev)
{
	......

	/* prepare interface data */
	ret = kobject_init_and_add(&policy->kobj, &ktype_cpufreq,
				   &dev->kobj, "cpufreq");
	......

	/* set up files for this cpu device */
	drv_attr = cpufreq_driver->attr;
	while ((drv_attr) && (*drv_attr)) {
		ret = sysfs_create_file(&policy->kobj, &((*drv_attr)->attr));
		if (ret)
			goto err_out_kobj_put;
		drv_attr++;
	}
memcpy(&new_policy, policy, sizeof(struct cpufreq_policy));
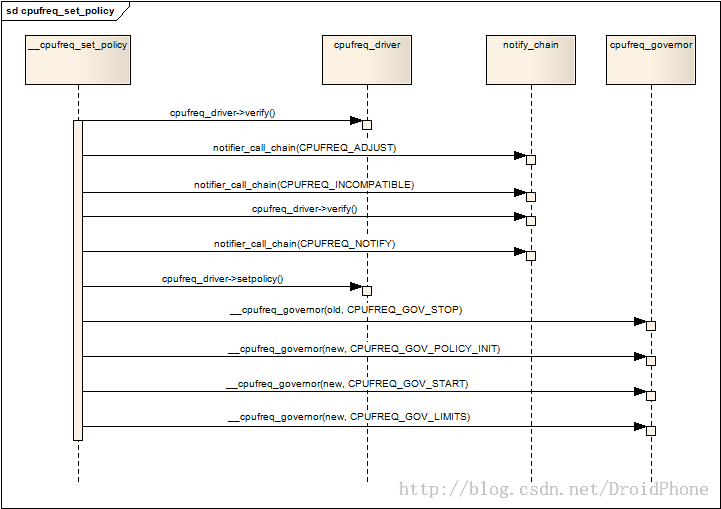
/* assure that the starting sequence is run in __cpufreq_set_policy */
policy->governor = NULL;
/* set default policy */
ret = __cpufreq_set_policy(policy, &new_policy);
policy->user_policy.policy = policy->policy;
policy->user_policy.governor = policy->governor;
int cpufreq_register_notifier(struct notifier_block *nb, unsigned int list);
int cpufreq_unregister_notifier(struct notifier_block *nb, unsigned int list);
CPUFREQ_TRANSITION_NOTIFIER      收到频率变更通知
CPUFREQ_POLICY_NOTIFIER               收到policy更新通知


int cpufreq_driver_target(struct cpufreq_policy *policy,
				 unsigned int target_freq,
				 unsigned int relation);
int __cpufreq_driver_target(struct cpufreq_policy *policy,
				   unsigned int target_freq,
				   unsigned int relation);
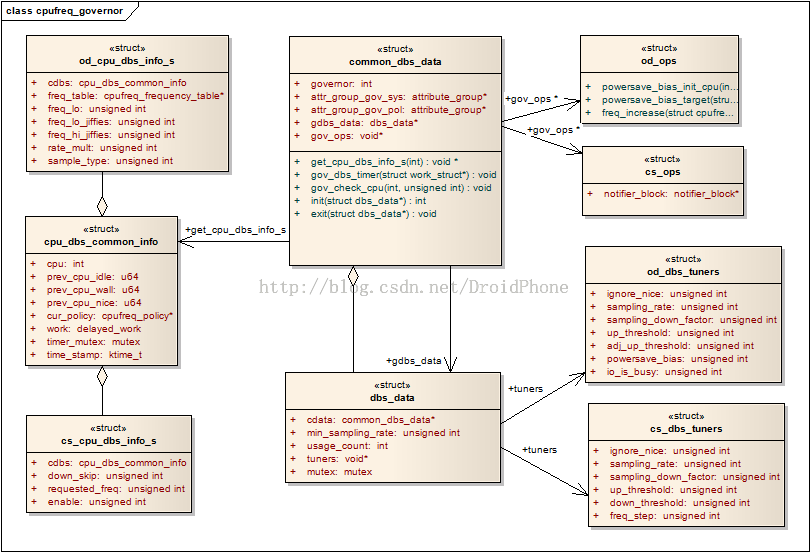
/* Per cpu structures */
struct cpu_dbs_common_info {
	int cpu;
	u64 prev_cpu_idle;
	u64 prev_cpu_wall;
	u64 prev_cpu_nice;
	struct cpufreq_policy *cur_policy;
	struct delayed_work work;

	struct mutex timer_mutex;
	ktime_t time_stamp;
};

cpu  与该结构体相关联的cpu编号。
prev_cpu_idle  上一次统计时刻该cpu停留在idle状态的总时间。
prev_cpu_wall  上一次统计时刻对应的总工作时间。
cur_policy  指向该cpu所使用的cpufreq_policy结构。
work  工作队列,该工作队列会被定期地触发,然后定期地进行负载的更新和统计工作。
dbs缩写,实际是:demand based switching,通常,因为cpu_dbs_common_info只包含了经过抽象后的公共部分,所以,各个governor会自己定义的一个包含cpu_dbs_common_info的自定义结构,例如对于ondemand,他会定义:
123456789
struct od_cpu_dbs_info_s {
	struct cpu_dbs_common_info cdbs;
	struct cpufreq_frequency_table *freq_table;
	unsigned int freq_lo;
	unsigned int freq_lo_jiffies;
	unsigned int freq_hi_jiffies;
	unsigned int rate_mult;
	unsigned int sample_type:1;
};
而对于Conservative,他的定义如下:
123456
struct cs_cpu_dbs_info_s {
	struct cpu_dbs_common_info cdbs;
	unsigned int down_skip;
	unsigned int requested_freq;
	unsigned int enable:1;
};